
Crafty Chaos: Mixed Media Family Tree
Hey, friends! I’m so excited to announce that my bestie, the infamous Erin, is going to be doing a monthly post for us she’s calling “Crafty Chaos!” The third Wednesday of the month, look for her here, sharing a fabulous new project she’s created! Here she is to share her first {incredibly awesome} one with us…
**************************************************************************
Hello dear One Artsy Mama readers! I feel like the luckiest gal alive that Amy has given me a chance to share some things I’ve been working on. Why “Crafty Chaos” you ask? I am the mom of two little boys, my Irish twins, who will be turning 2 and 3 this May! I am bound and determined to find time for myself and do something I love, even though my world can be quite chaotic! Moral of the story: If I can find time to do something crafty, ANYONE can!
So on to the project! Awhile back, Amy and I took a trip to Michaels, and she forced me thought it would be a great idea for me to buy a 10 pack of canvases, because they were “on sale” and “you have a gift card”! She’s a craft supply pusher.
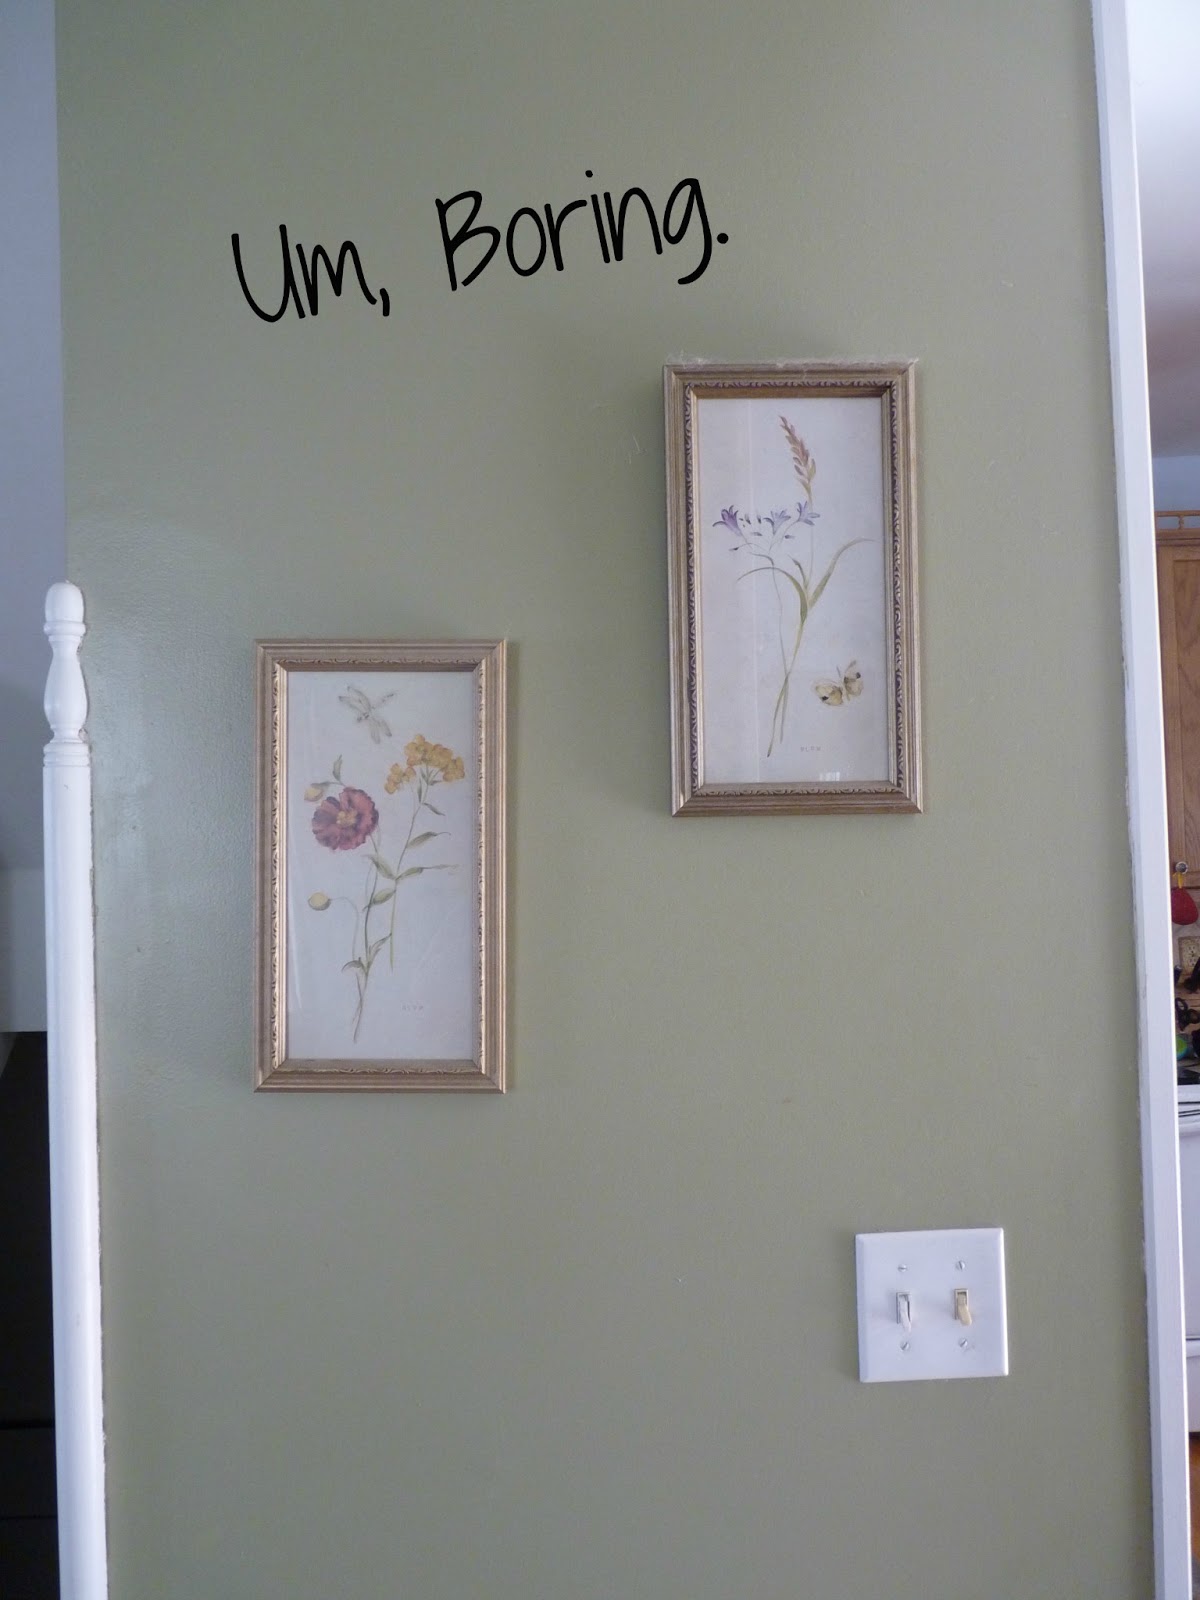
Fast forward to about a week later, and I was staring at my wall, and realized that it was kind of boring, and needed a face lift.
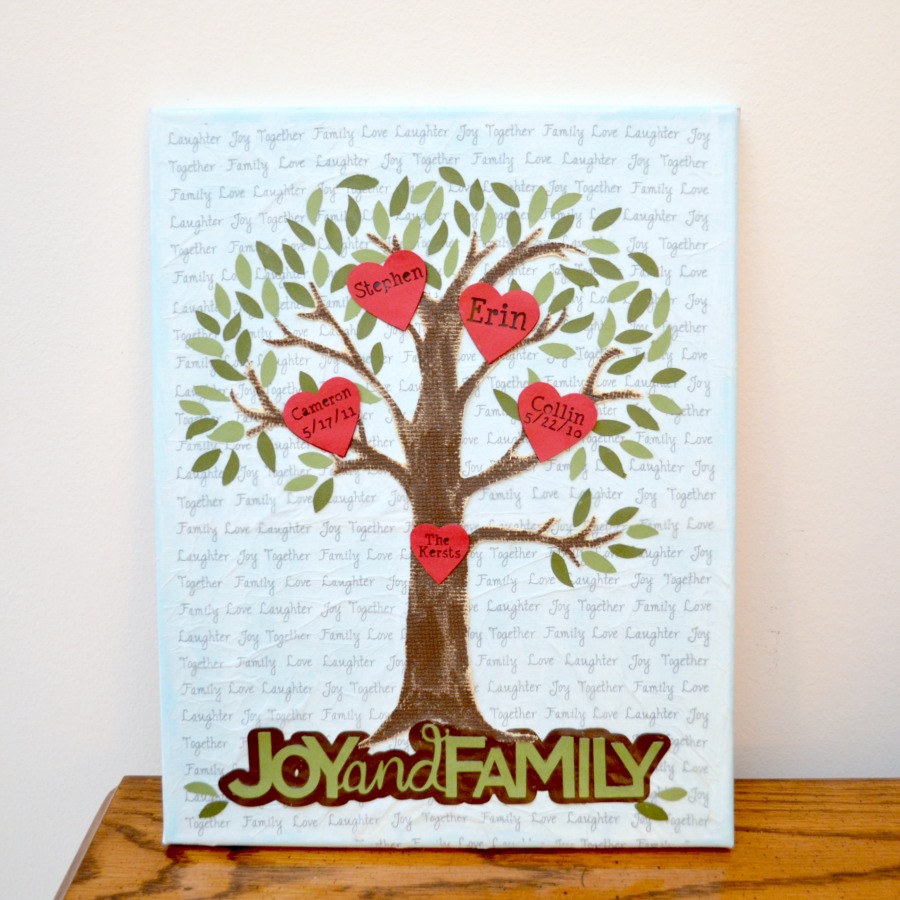
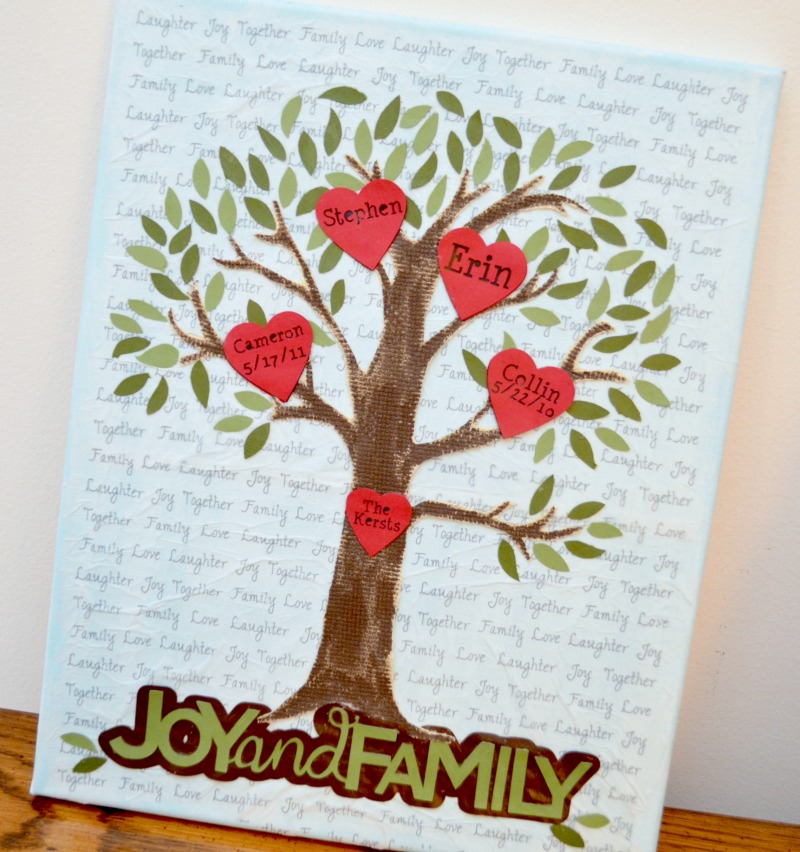
I wanted to make a “family themed” wall, and knew that a family tree would be perfect! I grabbed my blank canvas (thanks Amy) and started planning. The tree turned out exactly the way I wanted, and I’d love to share with you how to do it!
What you’ll need:
Blank Canvas-I used an 11×14, but whatever you’d like!
Tissue Paper
White Cardstock
Scotch Tape
Cardstock-Greens, Reds
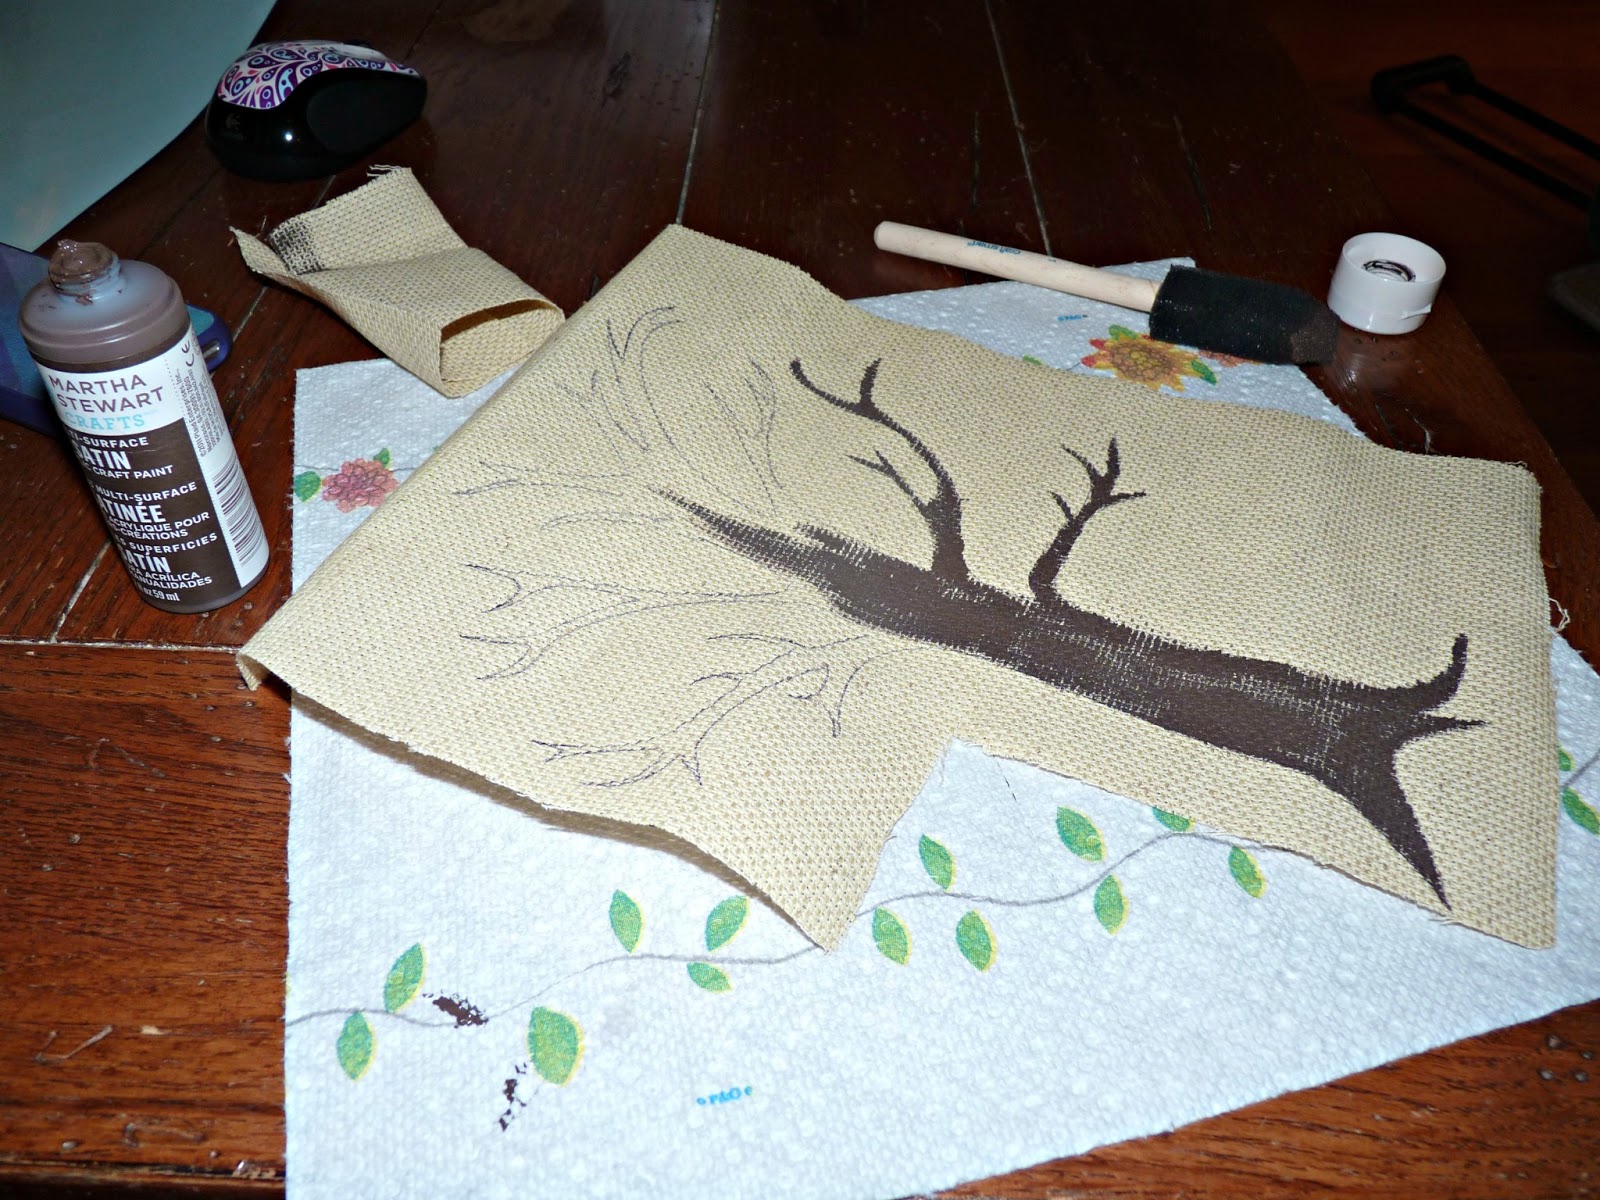
Fabric-for the tree, I used cross stitch canvas, because it’s what I had around
Vinyl –and either scissors, or a vinyl cutter (like my Silhouette Cameo!)
Tacky Glue
Mod Podge
Brown Paint, Blue Paint (I used Martha Stewart’s, because man, that stuff is great!)
Step 1: Tissue Paper Printing
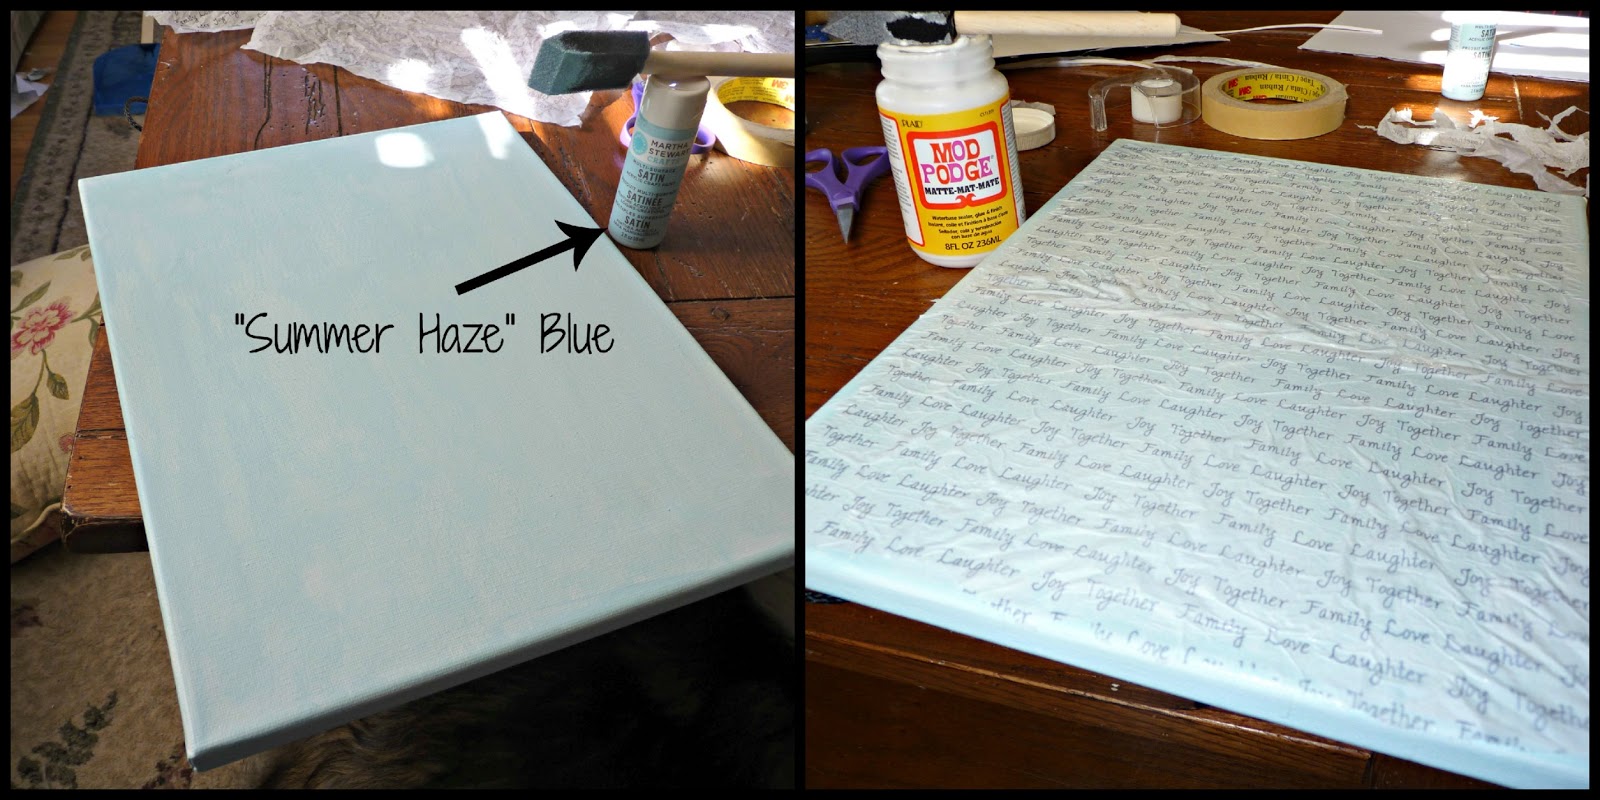
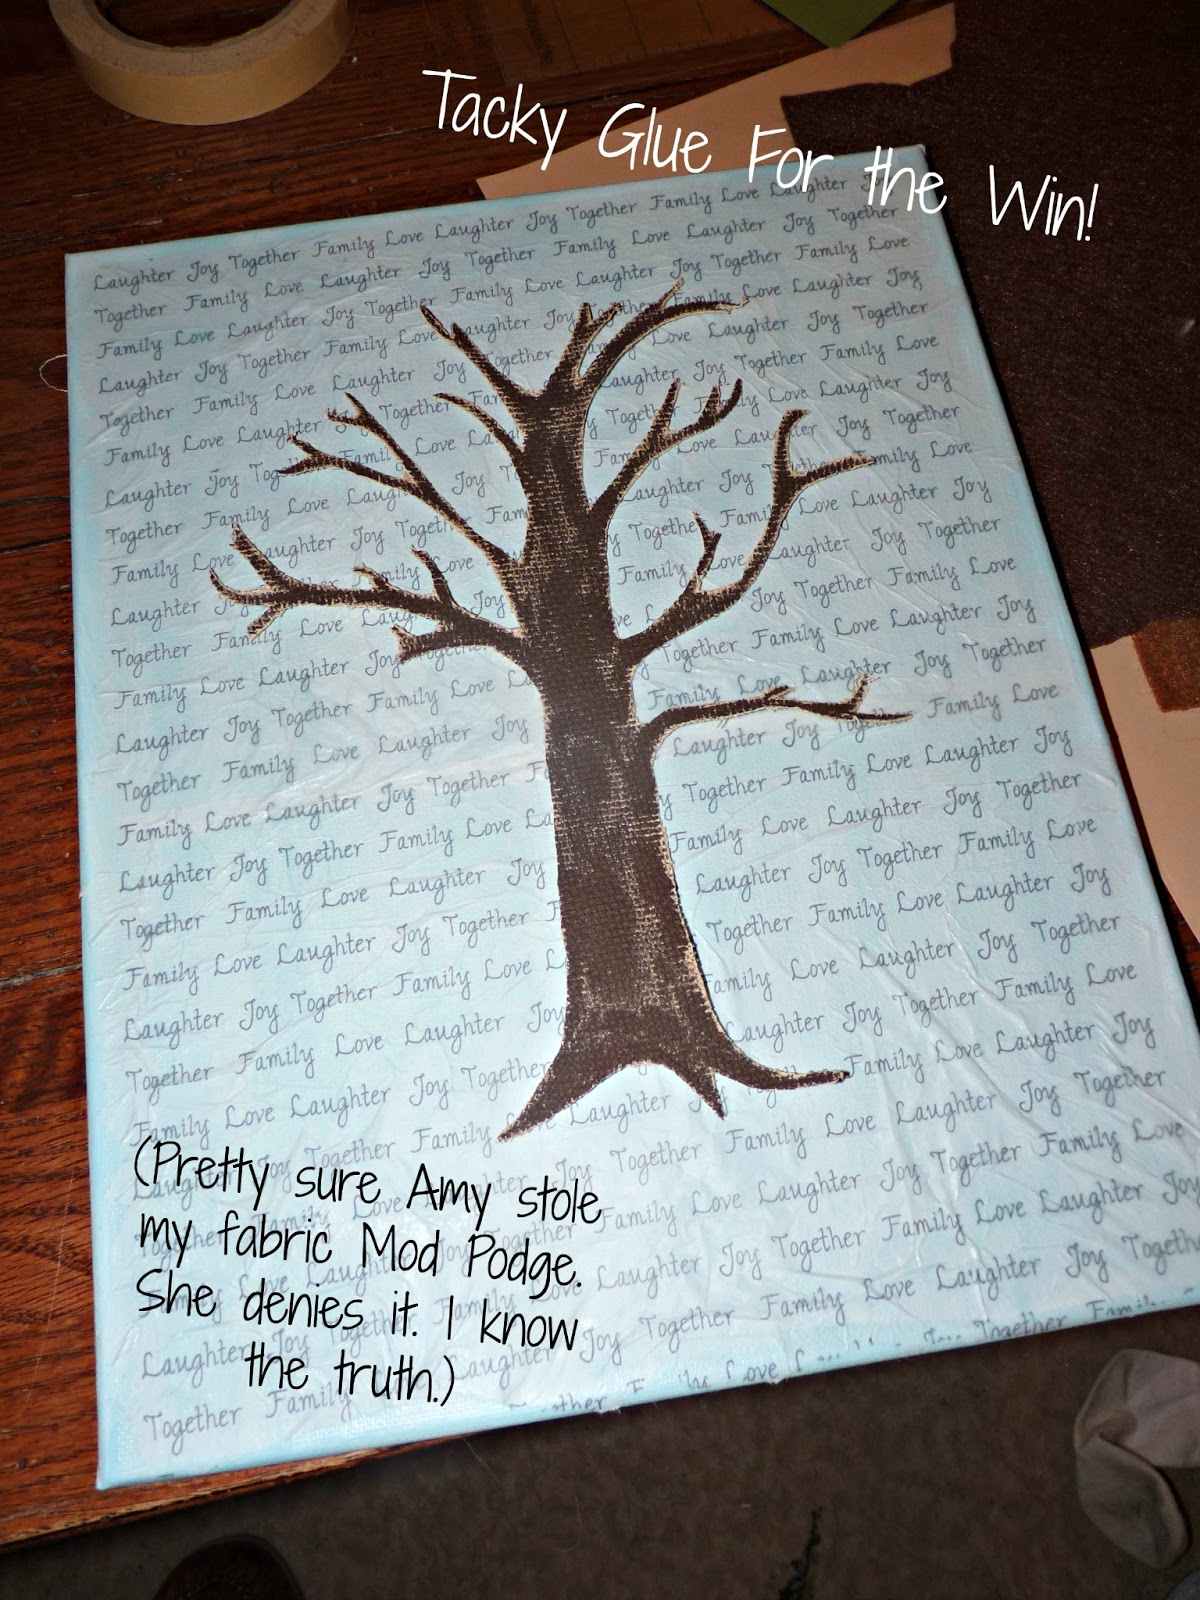
In my head, I really wanted words as the background to my project. I came up with a cool fusion of typed words and tissue paper, and I love how it turned out!
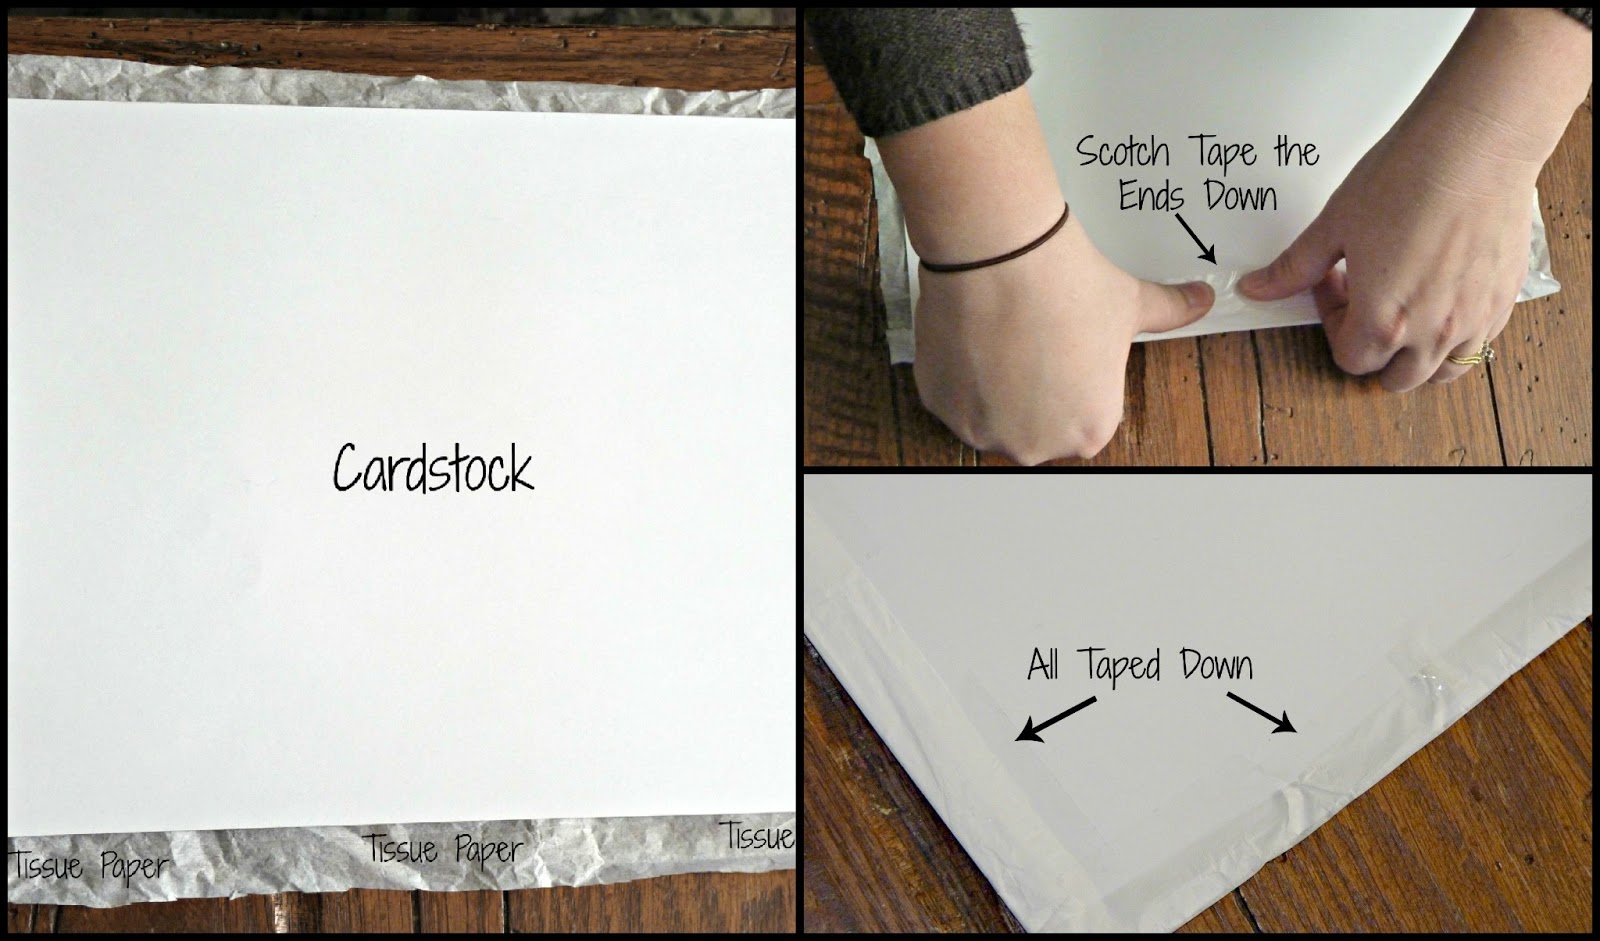
Grab some white tissue paper (Doesn’t have to be new, you can pillage from all those gift bags you have in your closet). Lay a piece of 8.5 x 11 cardstock on top, and trim the edges of the tissue paper so that they’re slightly larger than the cardstock-the tissue paper should frame the cardstock. Scotch tape down the edges, and ta-da, your tissue paper is ready to be printed on!
Now, open up your word processing program on your computer. I chose to make the page horizontal, and I picked a favorite font in a light black color (so that it would show, but not be overwhelming). I typed out a few favorite “family” words- family, love, laughter, joy, together, and filled the entire page with the words. Then it was time to load my tissue paper into the printer, and print out my words!
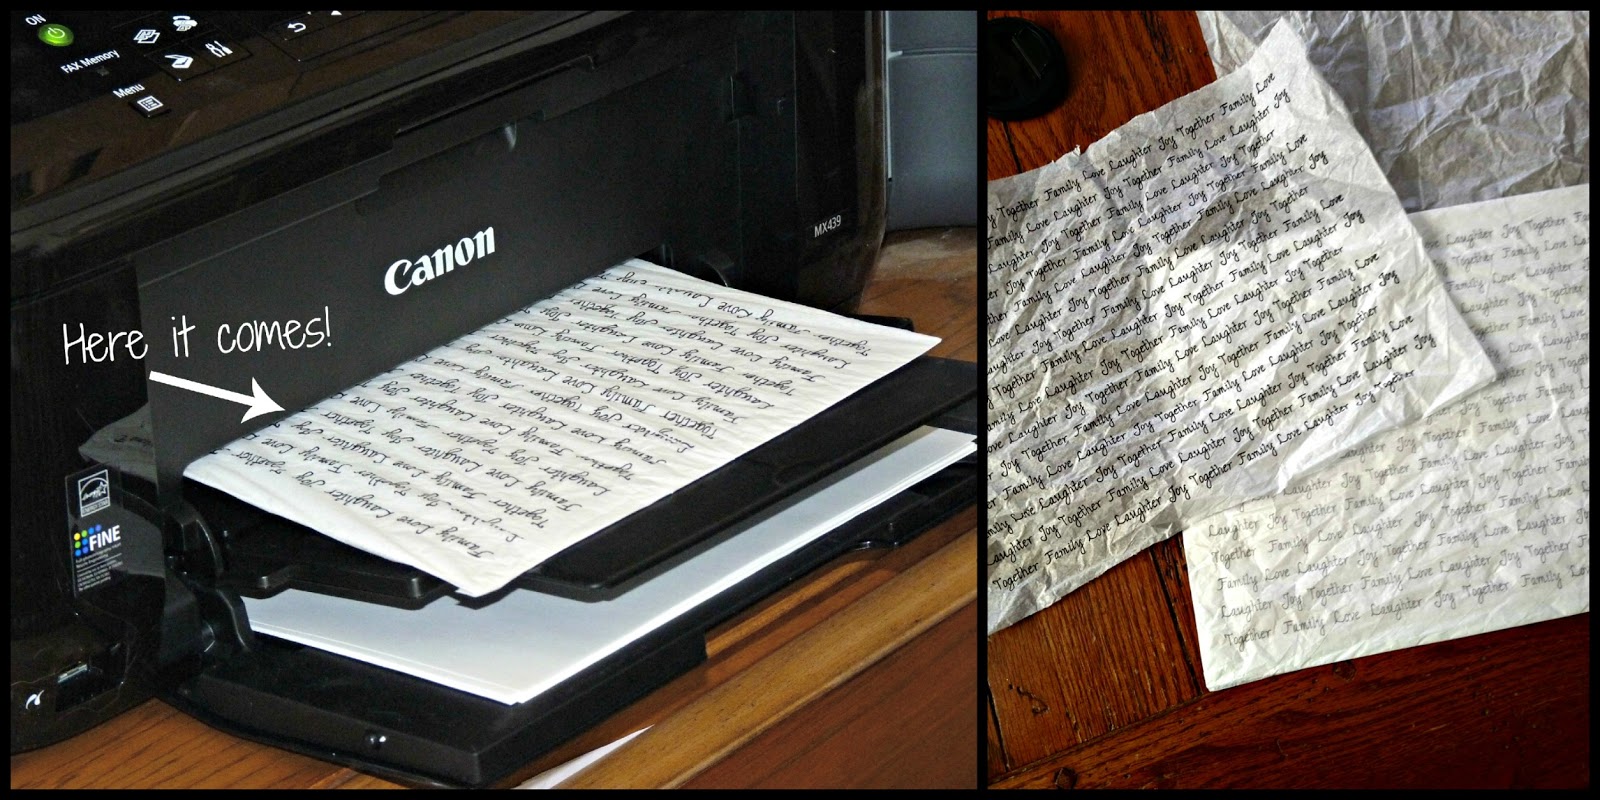
After it prints, carefully separate the tissue paper from the cardstock (scissors might help). If you’re not happy with the font/color/position, you can do it again! It took several tries for me to figure out exactly what I liked. Two horizontal sheets of paper fit my canvas perfectly!
I wanted to give the edges a little more “style” so I tore them.
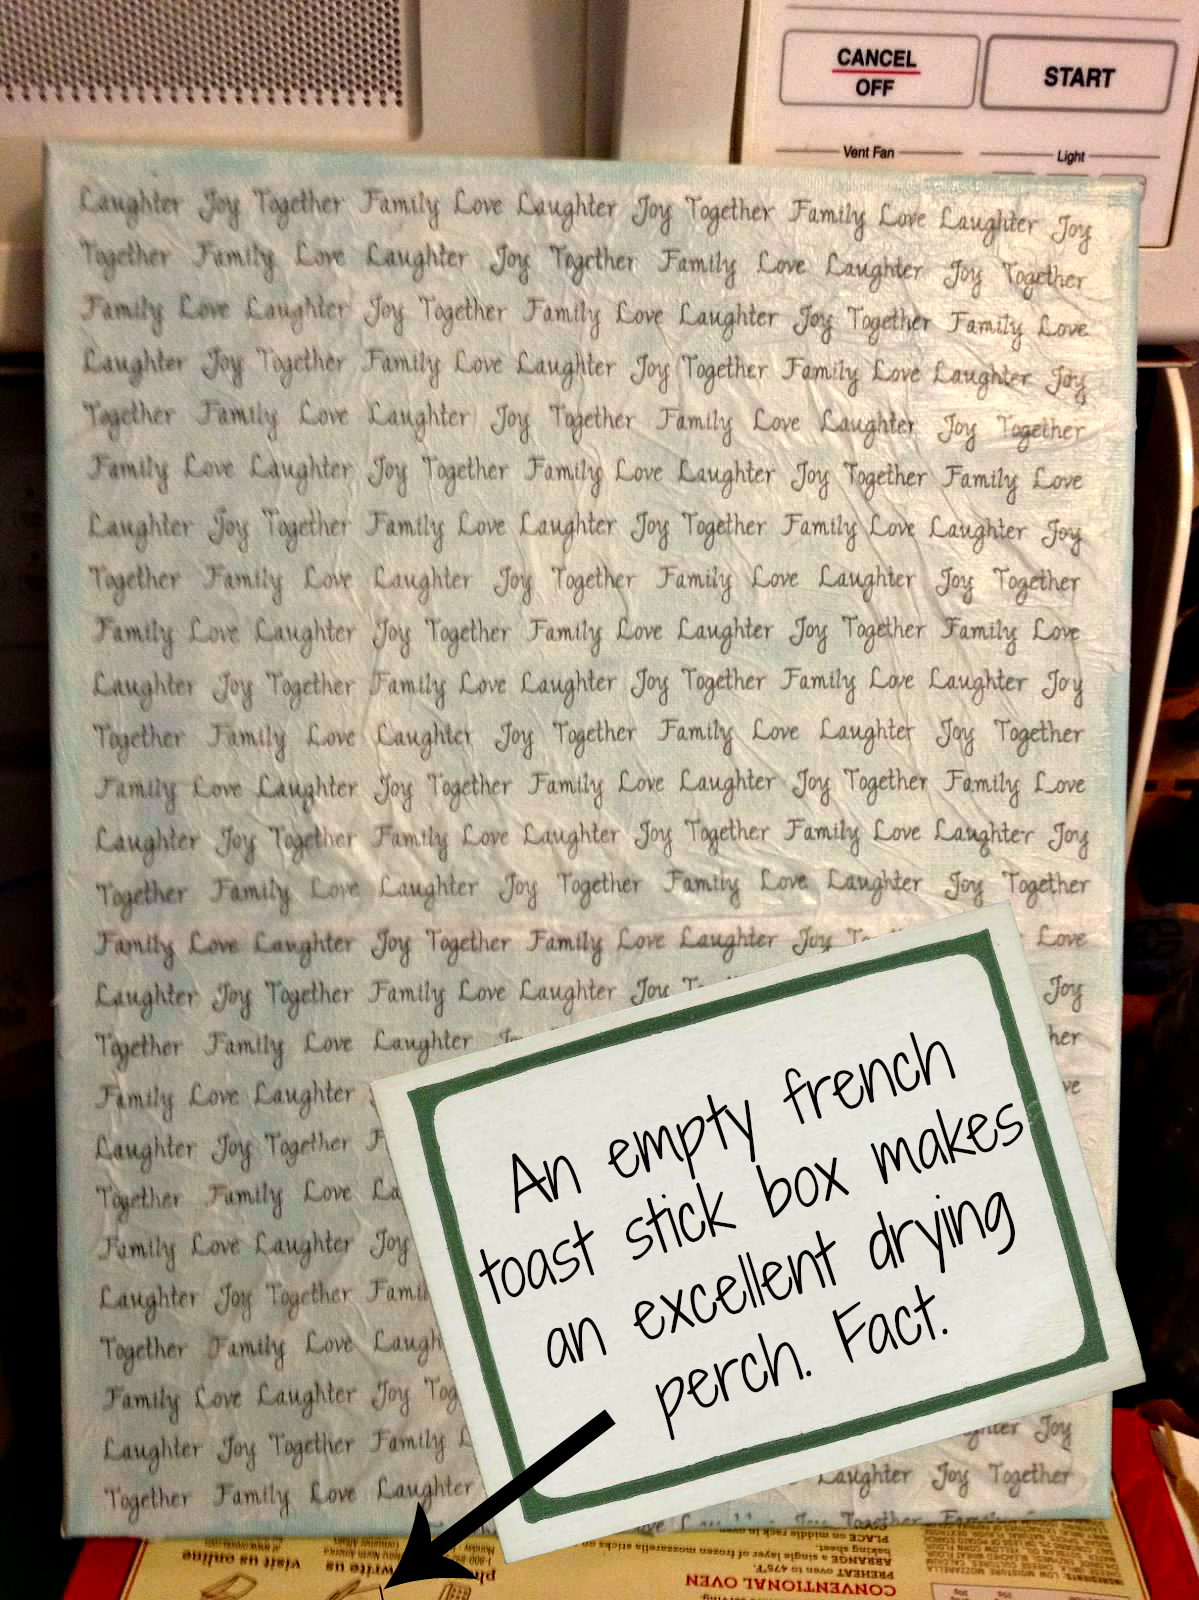
I chose to paint the canvas because it gave a hint of color with the tissue paper on top, but you’re welcome to keep it white! I chose a color to go with my walls, as well as give it a “sky” look. When the paint dries, cover the canvas in Mod Podge, and carefully place your tissue paper. Seal it with another coat of Mod Podge.
Let things dry for a while. I did overnight drying, but it shouldn’t take that long. I was just tired!
Step 3: The Tree!
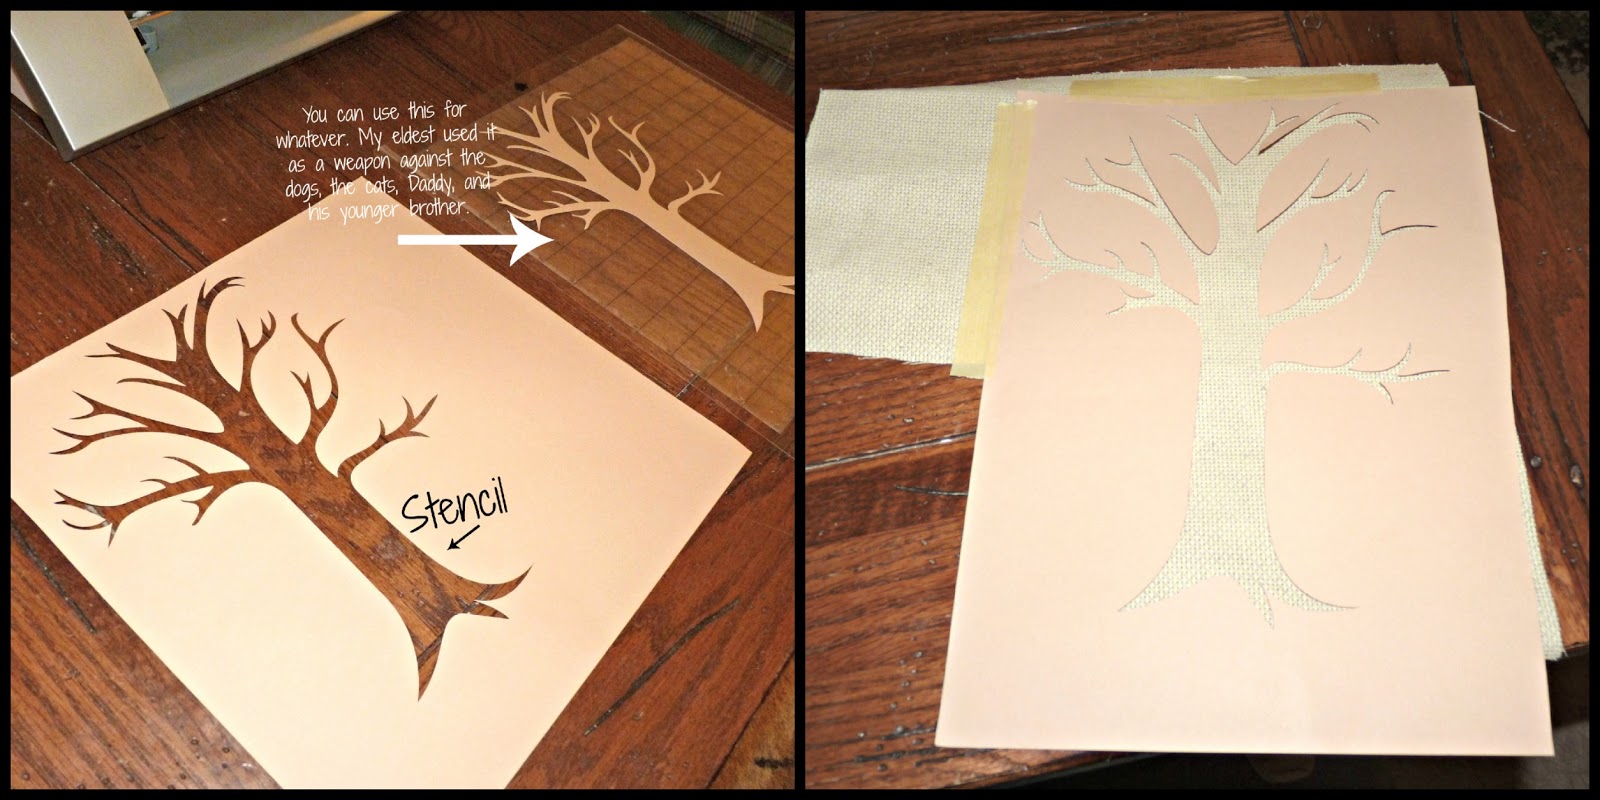
I am blessed to have a Silhoutte Cameo (which I lovingly refer to CK, as all my children have the initials CK. Yes, I’m lame.), and I was able to use it for a couple of things for this project. I used the software that came with it, and spent some time designing how I wanted the tree and lettering to look. And when I say some time, I mean LOTS of time, because I’m a perfectionist when it comes to this stuff.

After I chose my tree, I decided to cut it out on cardstock using CK, and make a quick stencil. You could also print and trace the tree and cut it out! Then I taped the stencil to the fabric, traced it, and cut it out. I’m sure I could have cut it out again on CK, but I don’t have a fabric blade, and it really wasn’t that bad.
Next up was painting the tree a nice chocolate brown. Easy peasy.
Then I ran into my first problem, attaching the tree to the canvas. I figured Mod Podge would work (Fabric Mod Podge would probably work really well, but I couldn’t find mine), but sadly it did not. Hot glue was risky when I had to glue the skinny branches (and for some reason Amy is not a fan of hot glue-she has a personal vendetta against it). {I do not!! I just don’t like the spiderweby strings and I knew it would make her tree look freakishly bumpy. So there. -Amy} I settled on Tacky Glue and it worked perfectly!
{pffft! I did no such thing! I have my OWN Fabric Mod Podge, thank you very much! – Amy}
Step 4:Lettering-a hybrid of cardstock and vinyl
I wanted to add a nice “family phrase” on the bottom of the canvas, so I hopped back on the computer and used the Silhouette software to find the perfect design. Now, I could say that I wanted to be totally adventurous, and that was the reason for a cardstock/vinyl hybrid saying, but honestly? Yeah, I didn’t like my green vinyl, but I like the cardstock green, and I didn’t like the brown cardstock, but I liked the brown vinyl. Got that? Anywhoo, I used CK to cut both out. Next up was attaching the cardstock to the vinyl. This took A LOT of mod podge. The cardstock just didn’t want to stick, but I kept at it. Then, when I started to peel the vinyl up, the cardstock started to pop off. Ugh. Grabbed the spatula, and lifted the whole thing that way. I finally wrangled the whole thing on to the canvas, but I had to add LOTS more Mod Podge-between the cardstock top layer and the vinyl bottom layer, as well as all over the whole thing, to keep it in place. Sheesh.

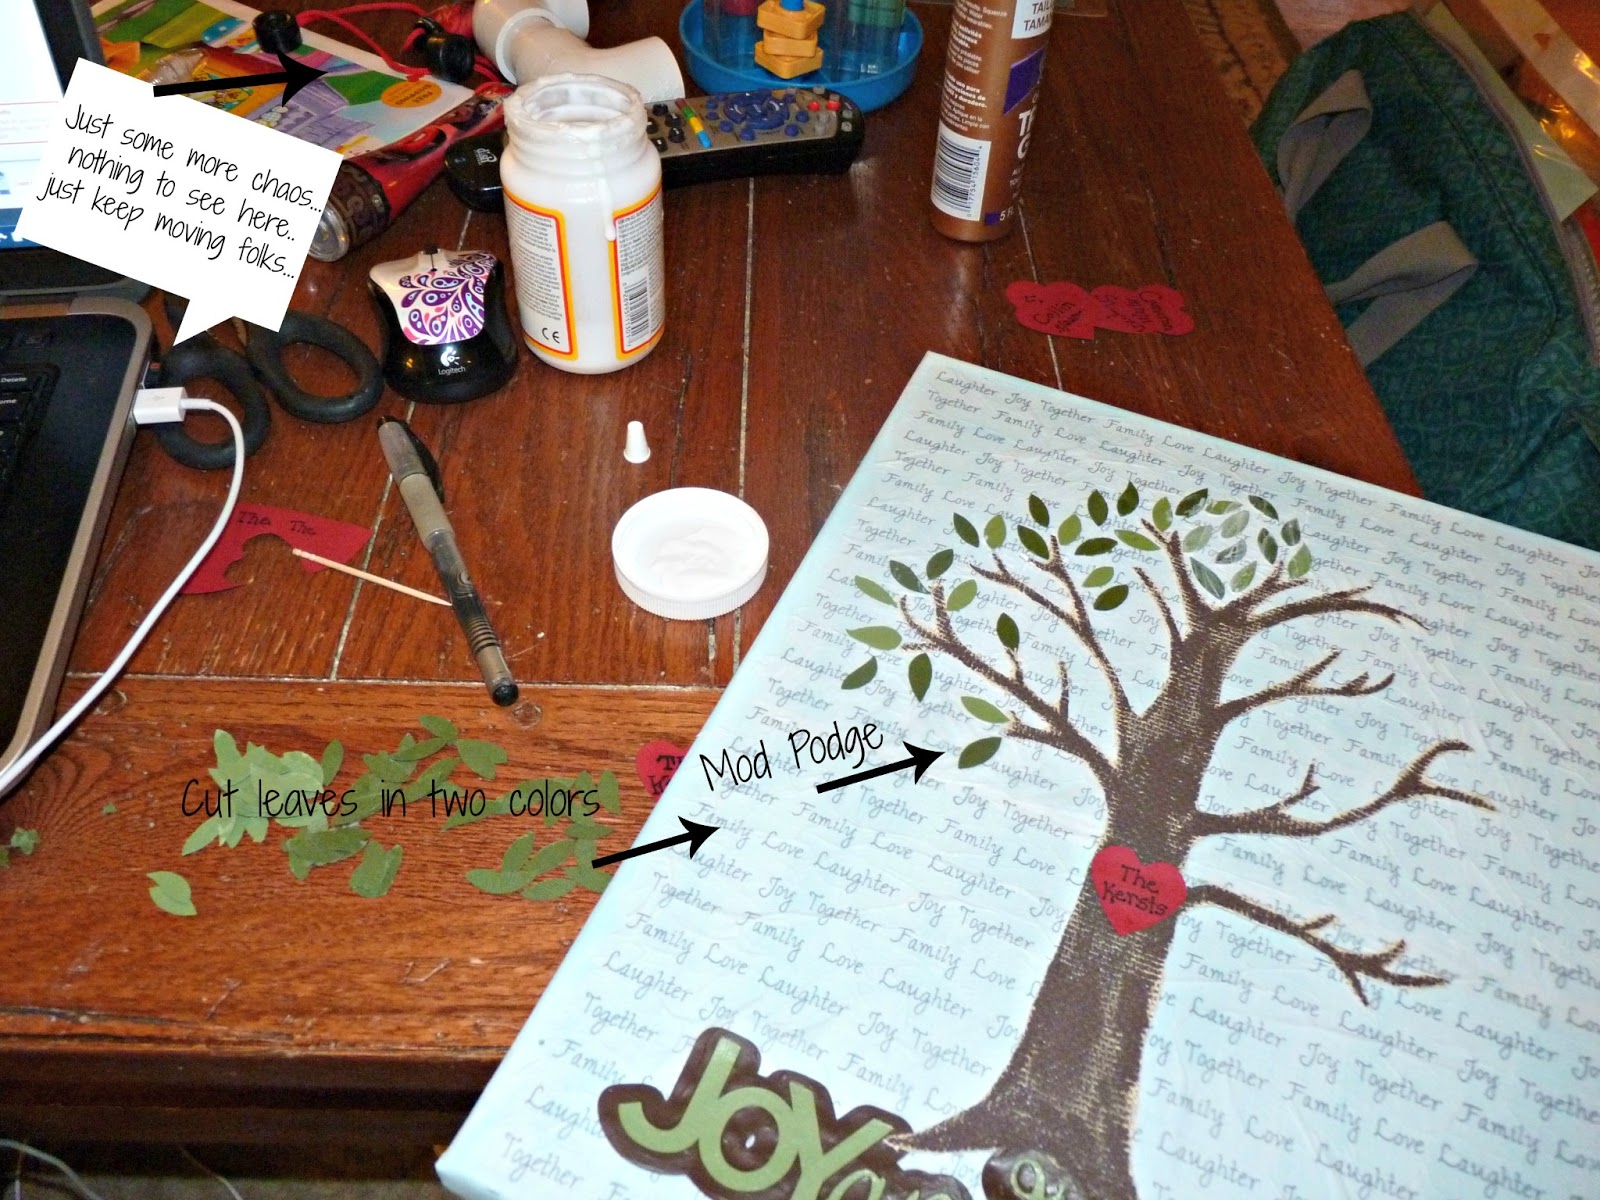
Step 5:Leaves
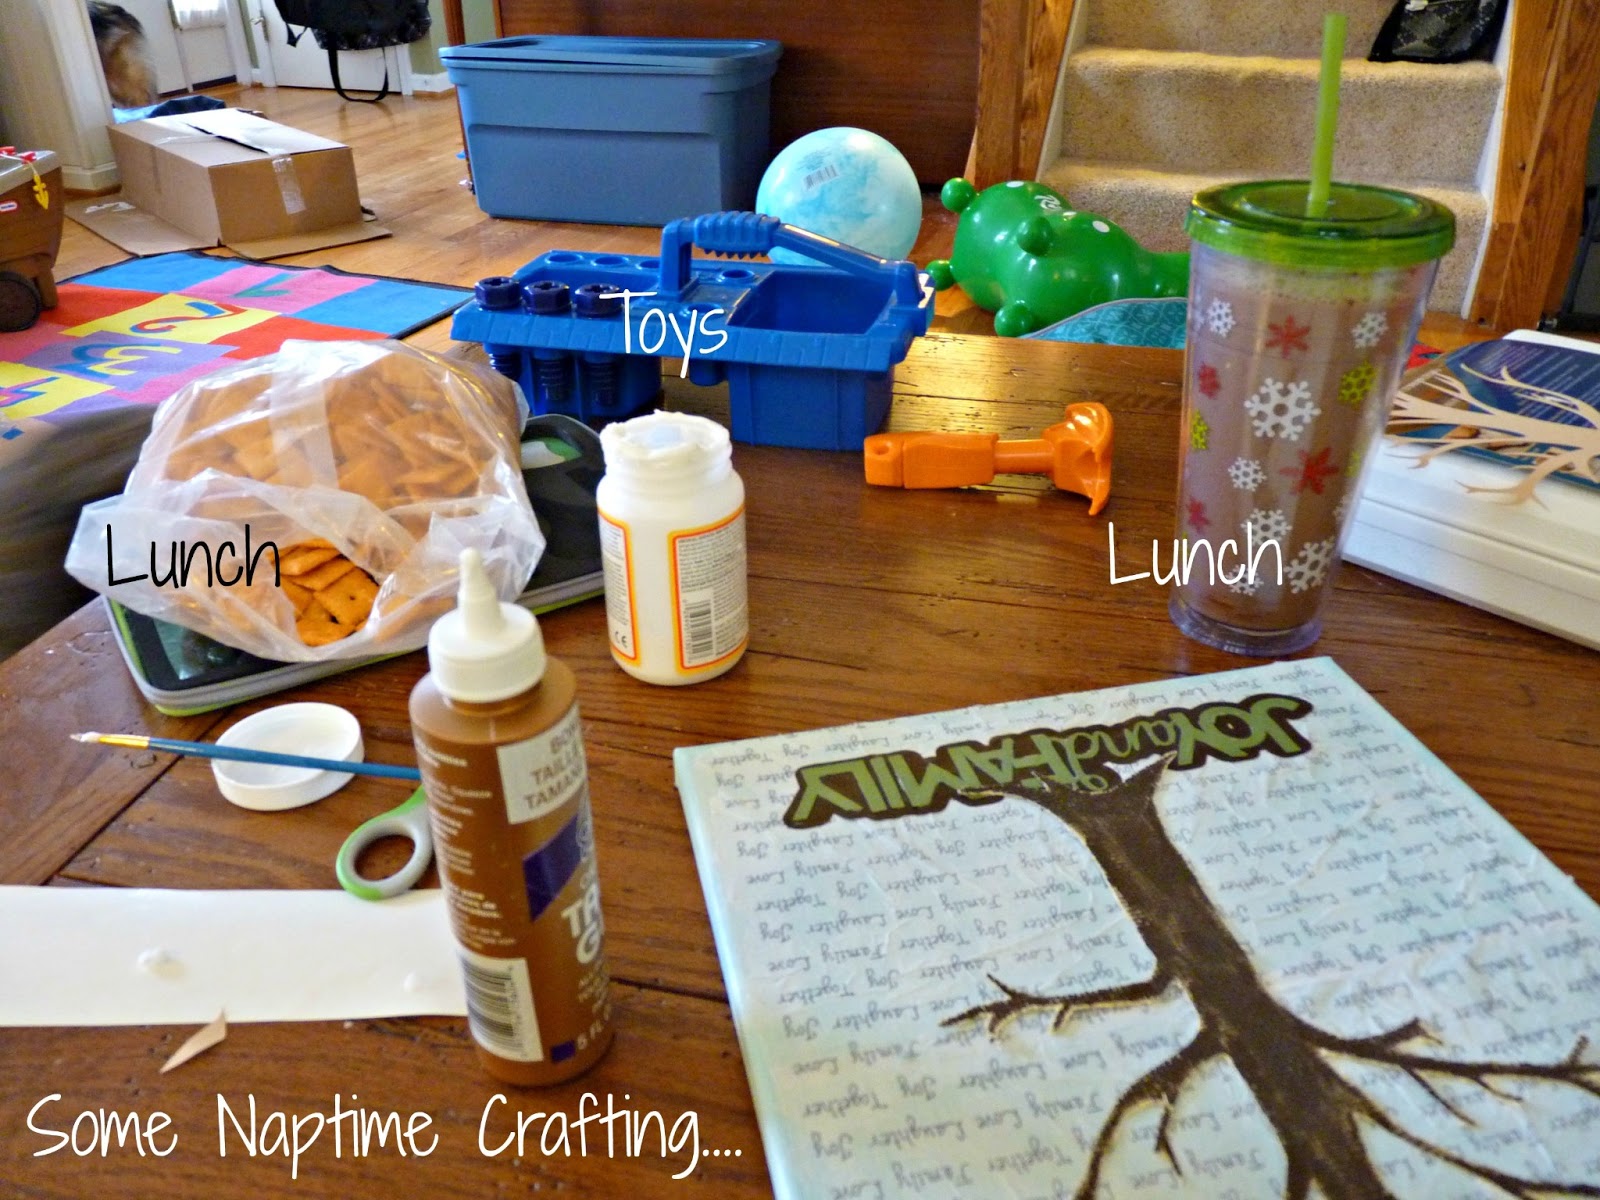
Using my trusty CK, I cut out leaves from cardstock, in two shades of green. Obviously you can just cut out leaves freehand, and I highly recommend more than one shade, because it really adds to the project. To stick the leaves on, I would Mod Podge a section, place the leaves on top, Mod Podge over to seal. Bing, Bang, Boom. This step was easily done during the length of one nap time, so yay for that! And yes, time was limited, and I was in the groove, so lunch really was crackers and chocolate milk.
Step 6: Family Hearts
So now we come to the hardest part of the project for me. This was a labor of love, and I hope by seeing my mistakes, you are able to come up with something that works for you! When I was designing the tree, I knew I wanted 4 hearts in the leaves that had my family’s names (and the boys’ birth dates), as well as our family name on the trunk. So my original idea was to cut out the hearts on red cardstock using CK, and then cut our names in vinyl lettering, stick them on the hearts, done. The cardstock cut beautifully (as you can see in the above picture), and I had 5 perfect little hearts. So then it came time to cut lettering. I knew I had to make sure the font was big enough for the machine to cut, but I was also stubborn and wanted a certain style. I played around with the fonts, and made my first cut. Fail. Some of it was pulling up, some of it didn’t cut, it was a mess. Ok, try again. Picked new fonts, cut the vinyl, and…it happened again. At this point I wanted to cry, it was late, and I couldn’t figure out what was going on. By the way, I did learn how to completely take apart a Cameo blade, and clean it, so I guess something good came out of this. I cut one more time, and this time I actually got a lot of letters to work with. Only they didn’t want to peel off. At all. And when I did get one peeled off it was all twisty and didn’t work. That night, I ended up taking a marker, and in my very best handwriting, I wrote our names and dates, stuck them on the canvas, and called it done.
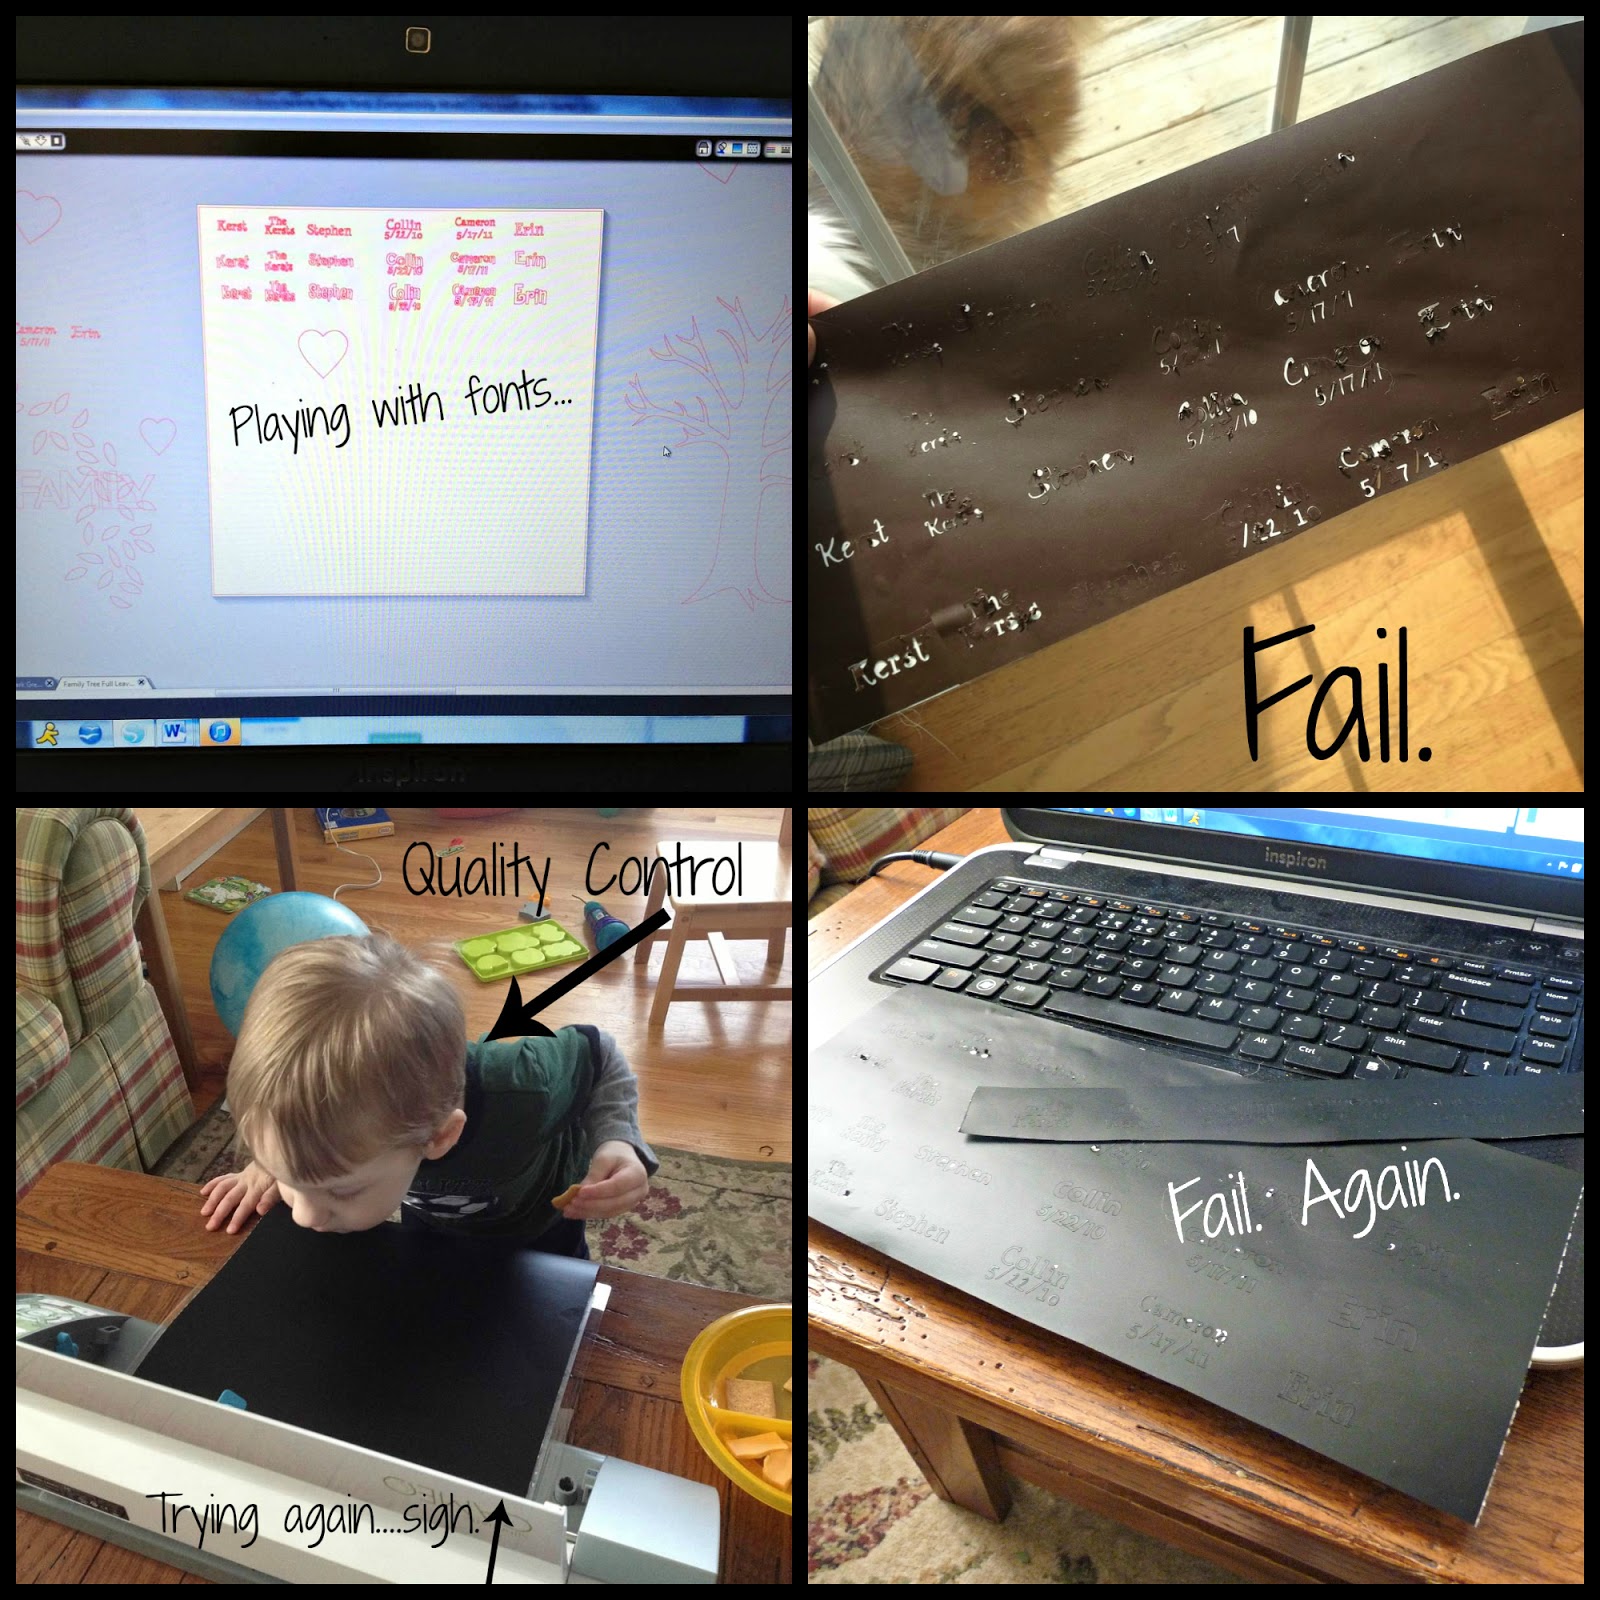
Now, as a crafter, you have a certain image in your head and if the final project doesn’t match that, then you know you’ll never be happy until it does. So the next day, I looked at the project and knew I had to try the hearts again. At this point there was much texting/calling/whining to Amy. “Relax.”, she said, “Quit your whining, I have an idea.” Yes, that’s why it’s important to have best friends. If you remember, Amy had made an adorable candle holder with a heart that had the letters CUT OUT. WAIT! I could use the same technique here! I cut out the hearts in black vinyl, and then I cut out the hearts in red cardstock, but with the names inside. I was able to punch out the letters, glue them on to the black vinyl hearts, and voila! It worked! Stuck the black vinyl hearts to the canvas, and got the more professional look I was going for.


I’m not going to lie, this project took a lot out of me, mostly due to the lettering issue. If I had done Amy’s idea in the first place, it would have gone so much smoother!

I’m so glad I stuck with it though, because it turned out exactly how I wanted it to, and when your friends ask you “where did you buy that?”, you know you have a winner! It looks right at home, hanging on my wall.
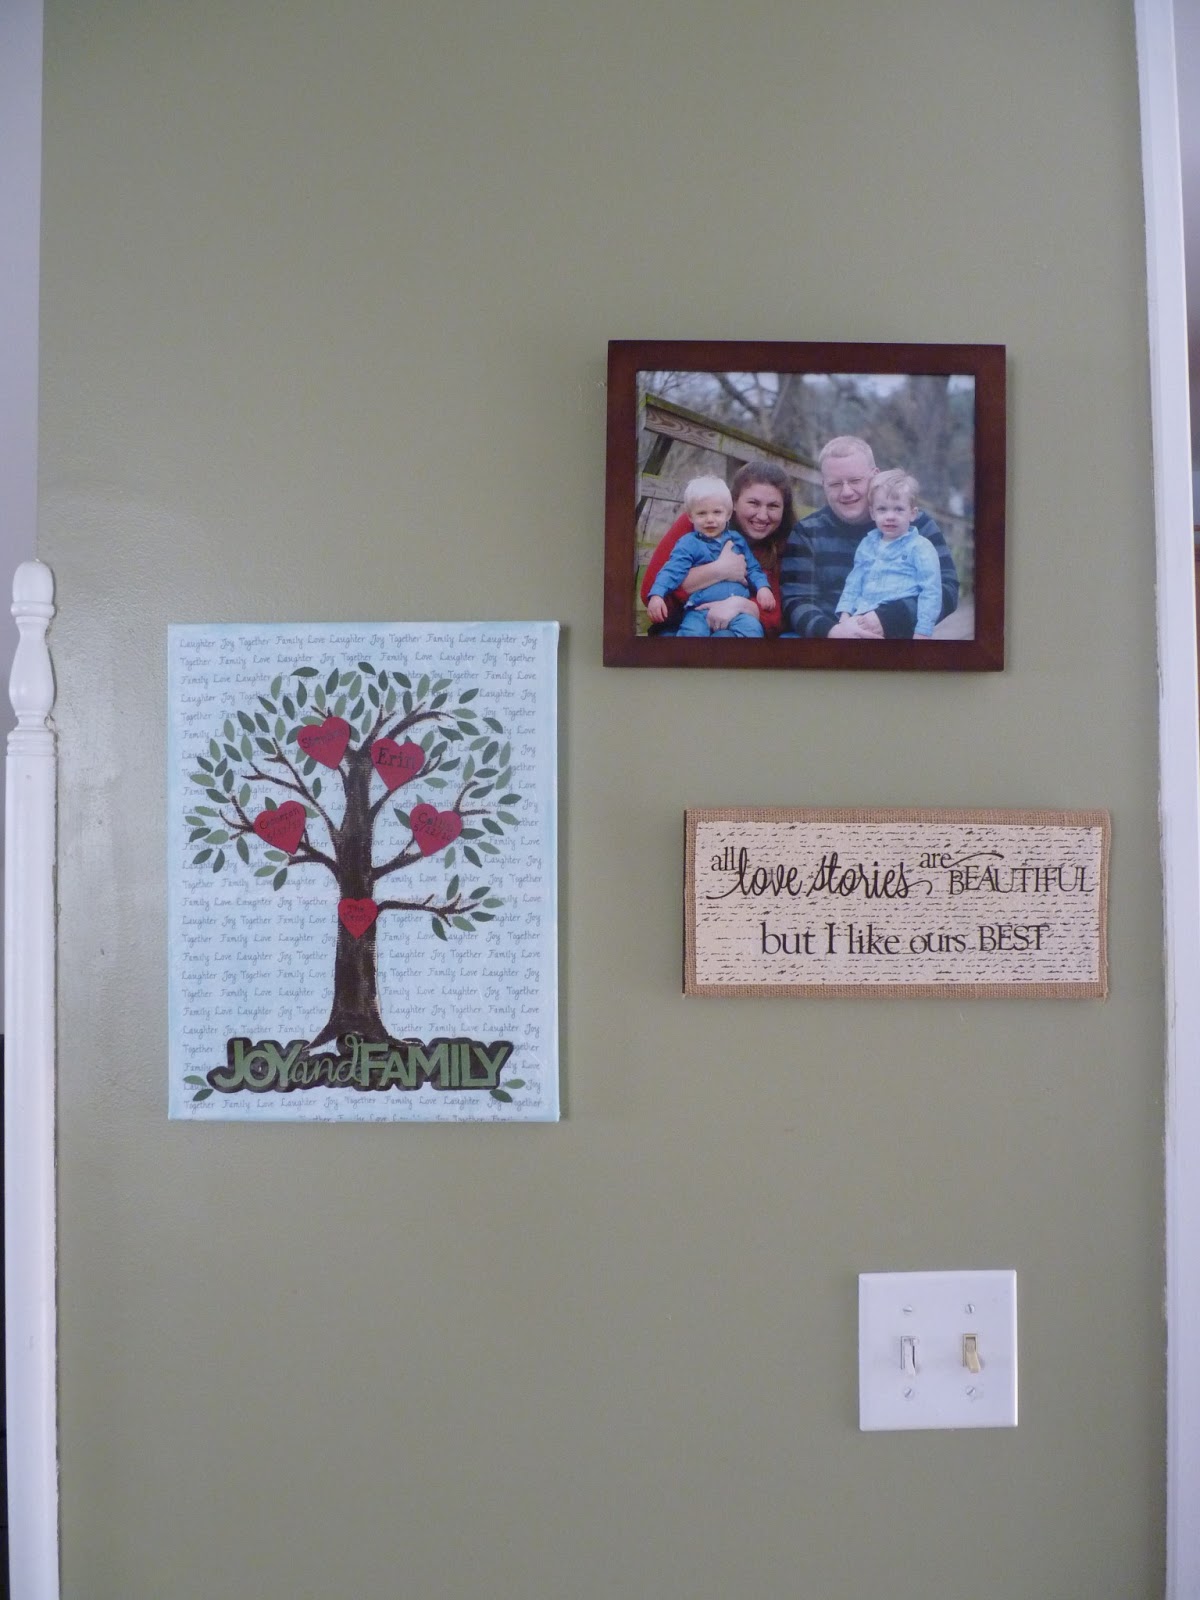
Isn’t it perfect? And there’s a teaser in that picture too, because next time I’ll be showing you how I made that sweet little sign below our family picture. Thanks for hanging out with me today and enjoy a little crafty chaos!


LOVE. Wow, and the journey…Phew. I’ve gotta hit the hay after that epic crafting. Exhausting post reading never mind actually doing. 😉
Love the end product of your adventure! It turned out great. (BTW, could you have stamped the hearts with an Alphabet stamp?)
~Emily
A Tossed Salad Life
That is an awesome idea. I’m trying to think of something to do with the bathroom walls that will include adding frames but not sure what yet
Love it!! I love the words background!! You did a fantastic job!! Pinning it!!
I enjoyed viewing your family tree tutorial! You’re funny, and so great you showed mistakes too!
Wow, Erin’s project is great! She’s definitely truly creative, like you, Amy!
I love how it turned out, even if it was a long process!