
Festive Placemats
When I saw this Valentine Placemat project from Katydid and Kid, I immediately pinned it and decided Little Crafter and I needed to make it. Right away.
Literally about two hours after I’d seen it online, we made our own version. I already had all the supplies I needed here at home, so why wait? We didn’t have any doilies, but I figured scrapbook paper hearts would work just as well…and they did!
Here’s ours and how you can make your own
FESTIVE VALENTINE PLACEMAT
Materials:
– transparent contact paper
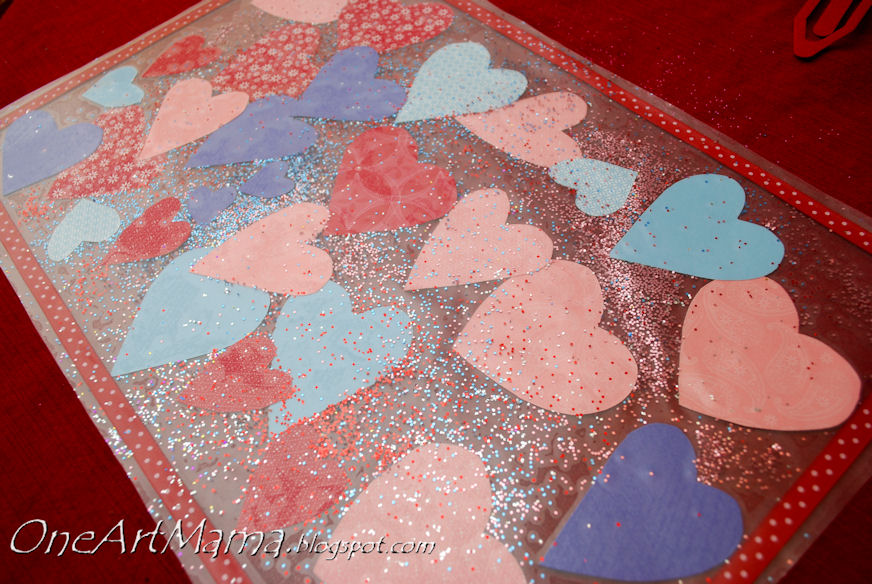
– scrapbook paper cut into heart shapes {and/or doily hearts}
– glitter {most of ours was provided by our friends at Craftprojectideas.com}
-ribbon
-scissors
STEP 1: Cut a piece of contact paper slightly larger than you want the finished placemat to be and place it sticky-side-up on the table, or in our case, the floor.
STEP 2: Use ribbon to make a border for the placemat by sticking it onto the contact paper in a rectangle shape.

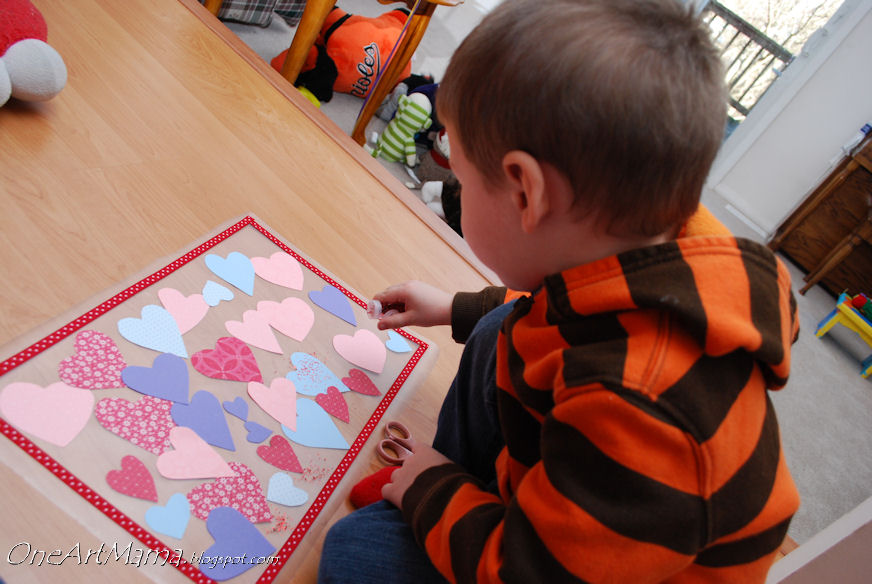
STEP 3: Place hearts wherever you want them to go and gently press down to adhere. We had to have blue and purple hearts too, since LC is adamant that blue, red, and purple are his three favorite colors.


STEP 4: Sprinkle with glitter.
STEP 5: Remove backing from another piece of contact paper. Place that second piece sticky side up. Take your placemat and flip it over, pressing it onto the piece of contact paper. Rub to get the bubbles out and make sure the two pieces seal. Trim around the edges.

ENJOY!
The beautiful thing about contact paper is that you can easily wipe it clean, it’s waterproof, and this placemat is even reversible! What could be more fun? And since we had everything we needed, it was free!
I’m actually kind of jealous of Little Crafter…I may have to get him to make one for me!
If you try this, I’d love to see!
Happy Crafting!


That turned out beautifully! I’d be jealous too. I think you definitely need one. The whole family needs one. I’m quite sure that you can never have too many glittered up Valentine’s day placemats. Haha. 🙂 I’ve pinned this as well and look forward to making one (or three) with my little boy.
I seem to be too clumsy to make things with contact paper, but I like your idea of flipping the first piece over and placing it on the second piece,….seems smarter somehow. This is really cute and you could do so many things with it. Love that it wipes right off, yet looks so pretty.
What a great idea!! We may try this one today. Thanks, Amy!
So cute, and such a fun project with kids!!
A few blog friends and I are hosting our first link party tomorrow to finish off the Imagine the Impossibilities Challenge, we go live at 7amET. Today I revealed my project for the challenge, a gallery wall with only one screw in the wall. It would be great if you have a chance to check it out and link up! http://thespacebetweenblog.wordpress.com/2012/01/30/the-one-screw-gallery-wall-is-here/
Karah @ thespacebetweenblog = your newest follower
Amy, those are adorable and look like so much fun to make! I would love for you to share them at my Valentines Party @ http://www.cheapcraftymama.com!
Love this!! It looks so easy and cute!
That is really cute…what a great idea…
You could make one like that for each holiday…nice that it’s washable too.
I’m sure he would love to make one for you.
These are very cute and so easy for the little ones! Love it, thanks for sharing. Visiting via More the Merrier Monday
Ok, Amy, check out Hazel’s. http://craftymomsshare.blogspot.com/2012/01/some-valentines-day-crafts.html I pretty much let her do what she wanted and you can tell. :o)
I found you on Tip Junkie. Would you please share this with my readers for
our Fun Stuff Fridays Valentine’s Linky Party? I think it would be a great fit. http://www.toysinthedryer.com/2012/02/14-days-of-valentines-fun-stuff-fridays.html
What a fun project! Pinning this idea. Thanks 🙂
Kristen @ Titus 2 Work in Progress
What a fun and easy idea, it turned out so nice! Something easy enough to keep the little one busy! Thanks for sharing!!
Oh my, this is so cute! I love it, thanks for sharing on Monday Madness!
so, so cute!!! I pinned this too!
thanks for sharing on the sunday showcase!
I want to make this. Where did you get the contact paper? I don’t think I’ve seen it in a roll before.
Just letting you know that I’ve featured this on Sharing Saturday this week. you can check it out and grab a featured button 🙂
http://www.mamamiasheart2heart.com/2012/02/sharing-saturday-6.html
~MiaB
Awesome!! I saw you on Tater Tots and Jello. Would you please be willing to share this fabulous post with my readers for Fun Stuff Fridays? http://www.toysinthedryer.com/2012/02/14-days-of-valentines-fun-stuff-fridays_10.html
I love this! I will definitely be making one with my 3 year old next weekend!
Very cute! Thanks for sharing!
Visit me sometime at my mommy/teacher blog: Teaching Munchkins
Sara
Teaching Munchkins