
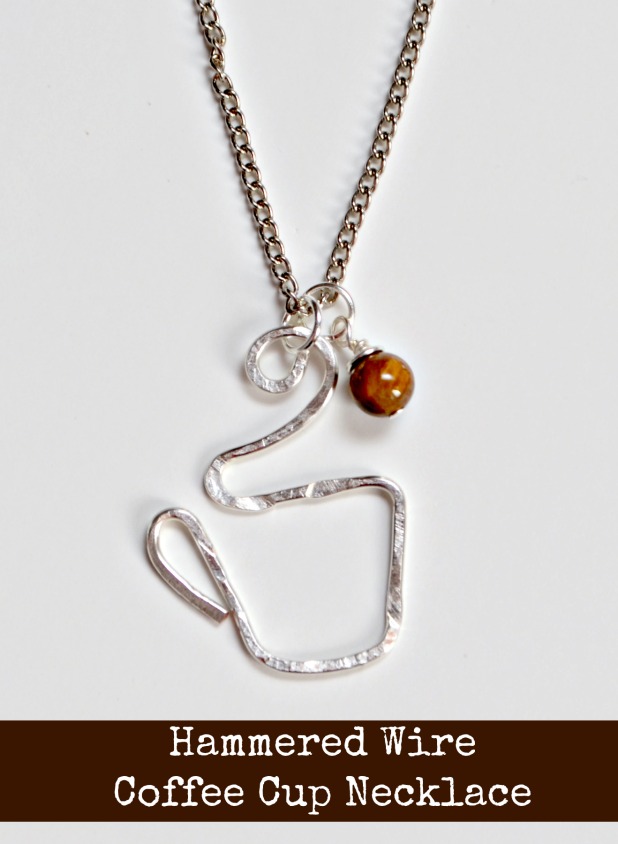
Hammered Wire Coffee Mug Necklace
Hey there, fellow warm beverage lovers! You all know I’m crazy about my coffee, so I used a brand new technique to make myself a fun coffee mug necklace! It works just as well if you’re a hot chocolate lover or a tea drinker too…and it’s so much easier to make than it looks! Here’s how I did it:
Materials:
– 16 gauge wire
– steel stamping block
– metal stamping hammer {mine was provided by ImpressArt}
– needle nose pliers
– wire cutters
– chain
– jump rings and clasp
– bead and head pin

Step 1: Without cutting your wire, form the shape of a coffee mug with your needle nose pliers. I start by forming a tight curl, then making an angle to create the top of the cup. Then, I use my pliers to shape the two bottom corners. Finally, I roll the wire back down to form the handle, then cut it from the roll.

Step 2: Now for the fun part…whack it! Use your hammer to flatten the wire by hitting it repeatedly. This is so fabulous because it’s a great stress reliever…it’s therapy that gives you a pretty piece of jewelry when you’re done! Like when it’s snowing for the four-billionth-time this winter and you just want to hit something; now you can!

This close-up view shows you the difference in appearance for the part you’ve hammered and the part that’s still just plain wire.

Once your piece is hammered, make sure it lays flat and looks the way you want it to. Then, it’s time to add a jump ring.

Step 3: Add your jump ring and chain to make it a necklace! Or, you could make two and turn them into earrings instead.

Step 4: Add a bead! I chose a brown bead that reminded me of the colors in coffee. I placed it on a head pin, made a wire wrapped loop, added a jump ring, and placed it on my chain. If you’ve never done beading before, check out this basic tutorial to get started.

That’s all there is to it! I never knew it could be so easy to make such a fun piece of hammered statement jewelry! What do you think? Would you wear it? Make it? How about a different shape?


P.S. I entered this project in the 2014 Crafting With the Stars contest on East Coast Creative Blog! Wish me luck!


That is really cute Amy!! I can’t wear costume jewelry although I could TRY to make things like that for my girls…I’m allergic to the nickel that’s in all of those metals. (and that stinks!!!)
They make several different kinds of wire including sterling silver and surgical steel for those of us with allergies!
Amy I absolutely LOVE this necklace!
I think this is one of my favorite pieces of jewelry you have made so far and you know that I love your jewelry. Adding the brown dangly bead was the perfect touch. Love it!!
This is a great tutorial! I’ve been thinking about trying my hand at the hammering of jewelry. You make it look super simple in this one! Thanks
I love this Amy!! I’ve never attempted making jewelry before but I might just have to! 🙂 This is SUPER cute!
You make beautiful Jewelry, plus you photography and explanations are simple to follow.
Aw, thanks so much, Karen!!
That’s fabulous! Might have to make myself one 😉
So cute!
I love the look of this piece, I will have to try making it. It will be my first time hammering a jewel.