
Merry Christmas Wall Decor & a Silhouette Giveaway!!!
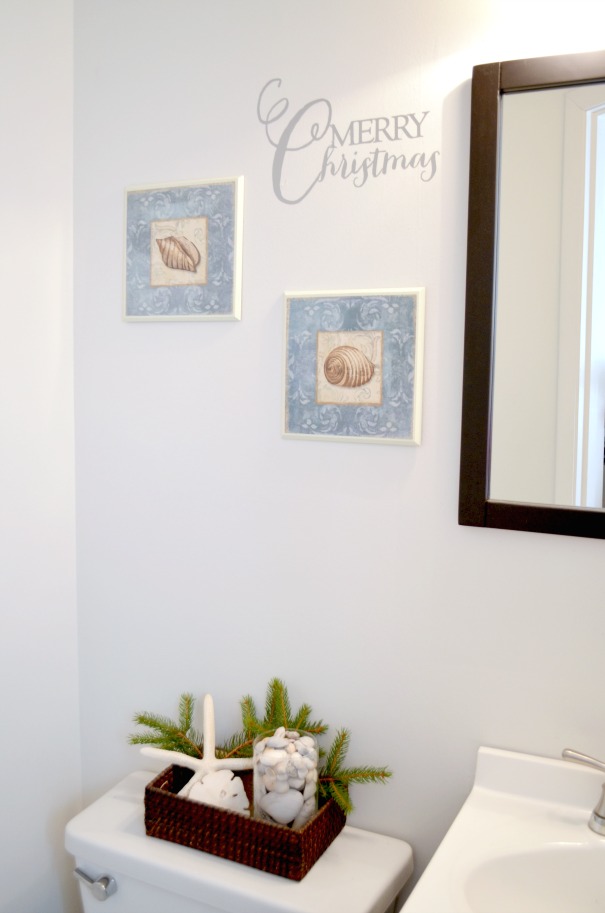
Hey, friends! This month, I’m participating in something really fun:  There are 35 of us sharing projects today that we made with our Silhouette machines, so get ready to be inspired. Now, I don’t know about you, but when I decorate for the holidays, I like be festive all over the house! I have decorations in the living room, the dining room, the basement, the hallway, the kitchen…but the trickiest place to decorate is the bathroom! Especially our main level powder room, because not only is it, well, a bathroom, it’s also teeny tiny! There’s barely room in there for everything you need, let alone extras. In fact, we even have a bit of an issue with where to put the hand towel because of the way things are laid out in there. So, I decided that if I was going to do any “Christmas-ifying,” it was going to have to happen on the wall.
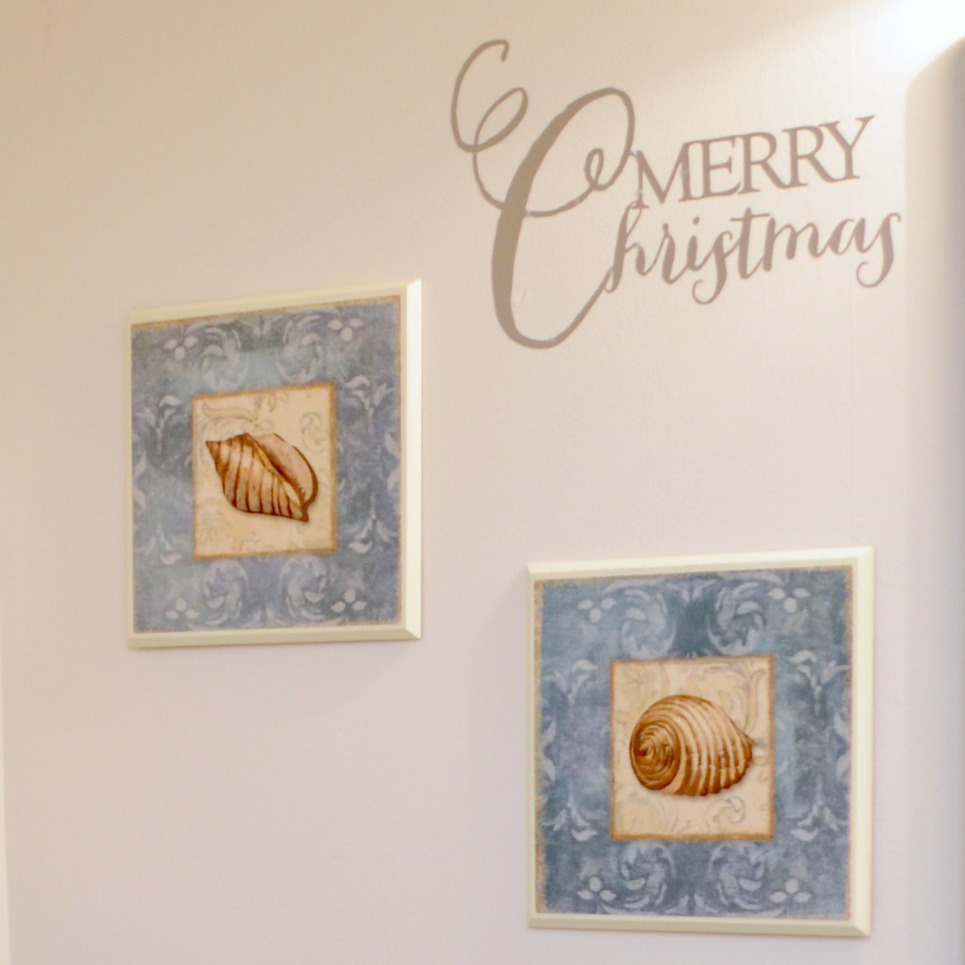
So, that’s just what I did! I pulled out my good friend “Cammie” {my beloved Silhouette Cameo” and put her to work making a bit of festive wall decor for my itty bitty powder room. It was super easy; I had downloaded a “Merry Christmas” design from the Online Store {I believe it may have been a free shape of the week last month}, so all I had to do was open it in my software. I sized it to be 12″ wide, then sent the design to Cammie to be cut.
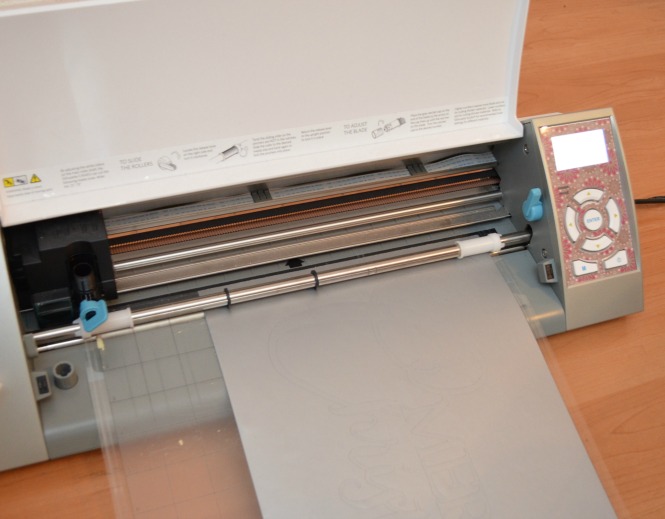 Once the cutting was done, I placed transfer paper on top. This is easy too; you just pull off the backing, and put it sticky-side-down on top of your vinyl.
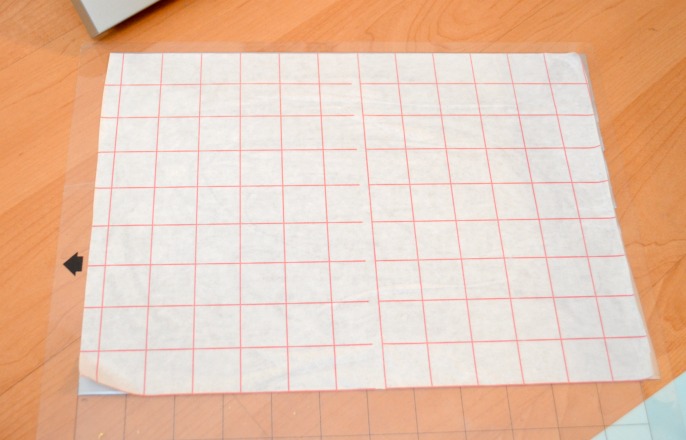
Then, you peel it off, and the cut design comes off with the transfer paper. Voilá! Now, it’s not quite as easy as it sounds because sometimes all the little pieces inside of letters come off too and you have to peel them off by hand, but still…very do-able.
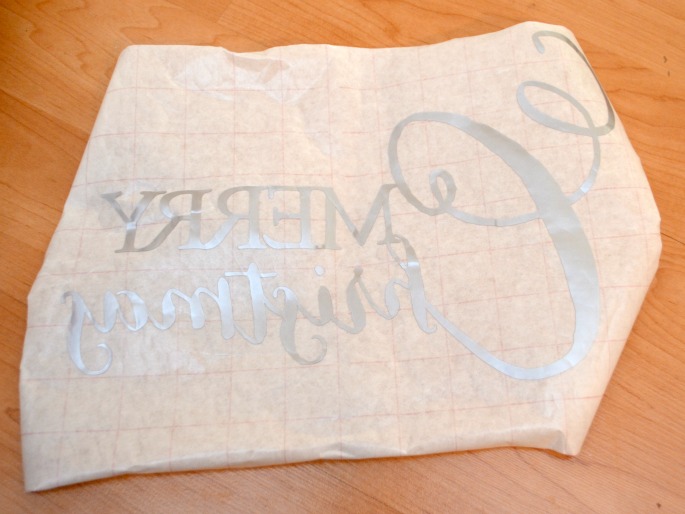
All that’s left to do is stick the whole shebang to the wall wherever you want it, and rub. The transfer paper has handy-dandy lines on it to help you keep everything straight if you like that sort of thing. I tend to do more eyeballing than measuring, mostly because I’m impatient, but hey…to each their own.
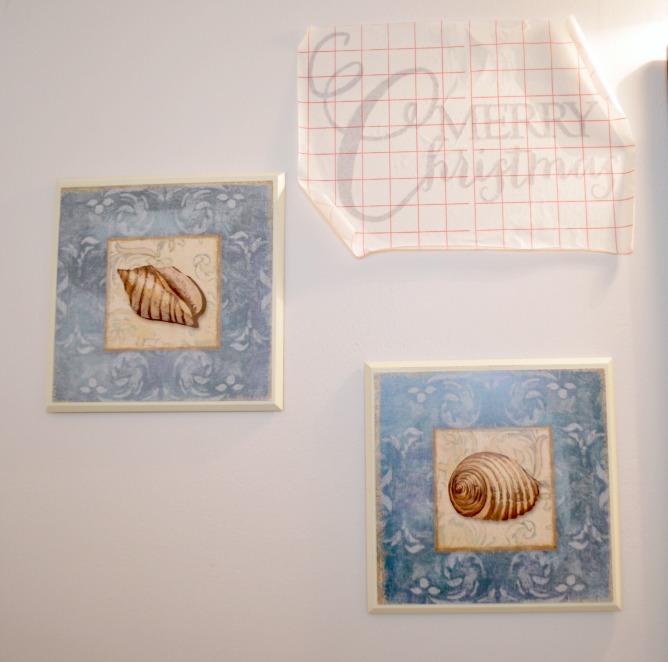
Then, you just peel off the transfer paper, leaving the vinyl stuck to the wall! Ta-da! You may be thinking to yourself, “That’s great, Amy, but what happens when Christmas is over and you have a big holiday thing stuck on your wall?” Simple, friends. That’s the beautiful thing about adhesive vinyl. It’s totally removable and won’t damage your wall at all! {unless you do something weird} It’ll peel right off like a sticker…in fact, it *may* even pull off nicely enough that you can reuse it again next year! Super easy, super fun!
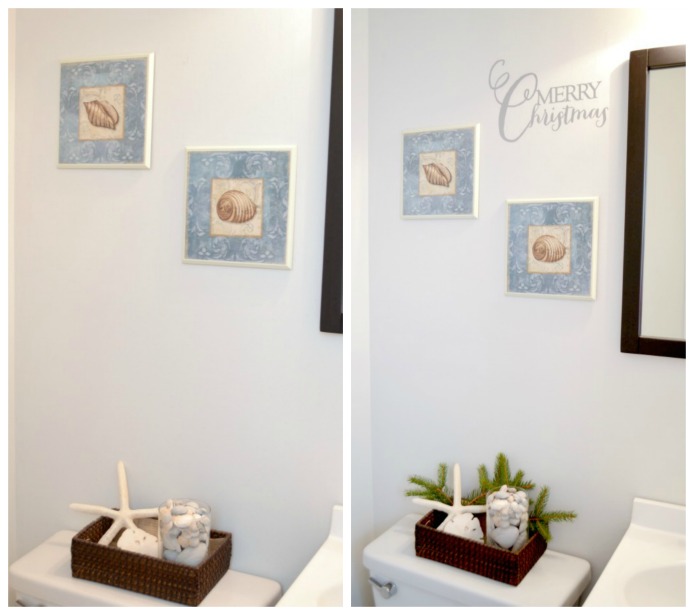
You may have noticed that I also added a few branches to my beachy basket.
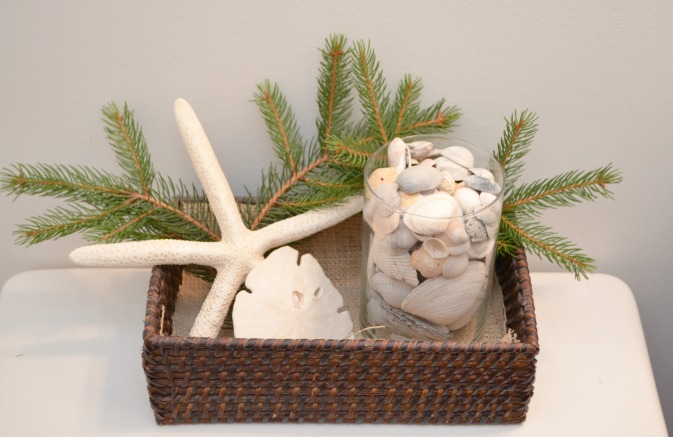
Special thanks to my {unsuspecting} neighbor across the street for, ahem, “donating” the branches. You didn’t see anything.

Isn’t it amazing how just a few small touches can totally change the feel of an entire room? What do you think?
Now for the extra fun stuff! The other bloggers participating in this month’s Silhouette Challenge and I are offering a $155 Amazon Card Giveaway, which is more than enough to purchase your own Silhouette Portrait!

Of course, if you happen to already own one, lucky you, you can use it toward anything you like! Rafflecopter will walk you through the entry process; good luck! a Rafflecopter giveaway
Speaking of those other fabulous bloggers…
Want to Check Out More Silhouette Projects?
My Silhouette Challenge buddies and I are all sharing projects on our blogs today, so peruse the projects below for a wealth of Silhouette inspiration!
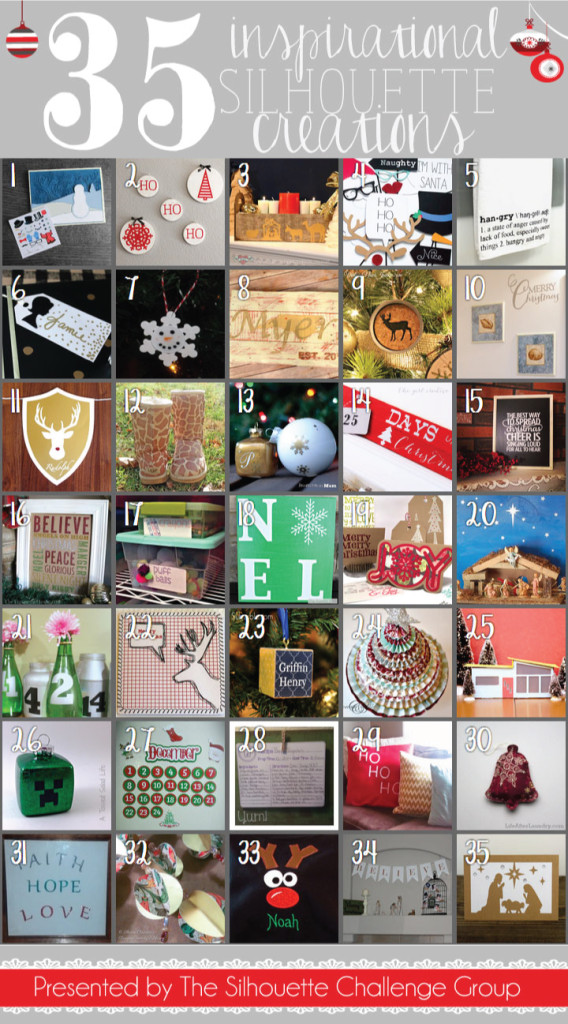
- 2013 Snowman Christmas Card by Please Excuse My Craftermath…
- Christmas Hoop Art by Lil’ Mrs. Tori
- Silhouette Nativity Advent Candle Box by One Tough Mother
- Christmas Party Photo Booth Props by unOriginal Mom
- Another Stenciled Tea Towel by Cutesy Crafts
- Silhouette Gift Tags by Rain on a Tin Roof
- Snowflake Pin / Ornament by Coley’s Corner
- State Sign Couple Gift by It Happens in a Blink
- Mason Jar Christmas Ornaments by Vintage News Junkie
- Merry Christmas Wall Decor by One Artsy Mama
- Deer Head Holiday Banner…featuring Santa’s Reindeer by The Thinking Closet
- Restore your UGGS (with PAINT) by From Wine to Whine
- Monogrammed Snowflake Ornaments by Architecture of a Mom
- Christmas Countdown Sign by The Girl Creative
- Elf Chalk Sign: “The Best Way to Spread Christmas” by Weekend Craft
- Glittery Christmas Subway Art by The Turquoise Home
- Sketch Pen Labels by Sowdering About in Seattle
- Snowflake NOEL Sign by My Favorite Finds
- DIY Holiday Hostess Gift by Everyday Paper
- Folding Nativity Backdrop by Chicken Scratch NY
- Recycled Glass Jar Advent Calendar by Nearly Handmade
- Reindeer Card: Double-Sided Print & Cut by GetSilvered
- Personalized Block Ornament by Suburble
- Paper Medallion Christmas Tree by Create & Babble
- Mini Mid-Century Homes by Tried & True
- Glitter and Vinyl Minecraft Christmas Ornament by A Tossed Salad Life
- DIY Countdown to Christmas Refrigerator Style by My Paper Craze
- Reversible Recipe Holder/Block Frame by The Sensory Emporium
- DIY: Lettered Christmas Pillows by The House on Hillbrook
- Simply Charming Christmas Ornaments by Life After Laundry
- No Glitter was Worn by GiveMeAPaintbrush
- Make Easy Ornaments from Paper Circles by Bringing Creativity to Life
- Cutting Machine Embroidery Applique by Terri Johnson Creates
- “Believe” Christmas Banner by Daily Dwelling
- DIY Christmas Nativity Card by Pitter and Glink
Do you have a Silhouette machine?
Looking for Silhouette inspiration, support, trouble-shooting? Interested in joining us for our group posting event next month? Then, we’d love to have you join our Silhouette Challenge Facebook group. To join, simply fill out the new member request form, and Lauren from The Thinking Closet will get you squared away.
Hugs & Glitter,


Wow…what a difference a few pine branches made…Love the addition…
very festive… 🙂
How awesome!
Amy, I have the exact same problem….small first floor powder room that needs “something” for Christmas and this is a great idea…I think I’ll steal, er I mean do something similar to mine ; )
Love it! I love the incognito way of getting branches, too! Your sign turned out cute!
I love the font you used! The vinyl plus the branches really does make a big impact on that room. Thanks for sharing!
Just curious why you used your mat instead of just putting the vinyl directly in the machine.
Your powder room definitely looks better with your decorations, and I love that you applied the Vinyl by eyeballing! I do the same thing so glad to know I’m not alone!
Good thinking!!! We also have a teeny tiny powder room and although I’ve already adhered cute quote vinyl on the wall I never thought about adding Holiday vinyl!! So good thinking!!
Love the wall decal! So cute. What a great way to add a holiday touch.
Wow, this looks fabulous! I love being able to use the vinyl on walls.
Looks very, very festive! I need to get working on my bathrooms! 🙂
Very pretty and festive.
My vinyl never comes off in a manner that it can be reused, but I think thats all me 😉 You don’t look at all suspicious in that get up and clipping branches LOL
Amy, what a great idea to decorate the walls. Your powder room looks fabulous!
Thanks so much, Camille!
Lol..Cute! Very nice, subtle changes. Love it!
Thank you!
What a great way to christmasfy your bathroom! I love your branch collecting outfit!
Heehee…thanks, Tori!
How pretty! I never thought of putting up vinyl for the holidays!
Your projects are all beautiful!
I need to try my hand at applying vinyl right to the wall – I haven’t gotten brave enough to try it! Love your “Merry Christmas” – so sweet!
Love the phrase on the wall and the pine branches are the perfect finishing touch. I’m currently sussing out where I can “acquire” some greenery for my Christmas table.
I love the font you used! Looks great!
BAHA! You sneaky little thing, stealing (I mean, borrowing) branches from the neighbors. 😉 Love your wall decor – very festive!
love how simple this is–and subtle–an easy way to add a Christmas cheer to another room in your house!
I just love it!! I haven’t done any wall decals yet, but I think I know what my next project should be! Thanks for the inspiration! You rock!
Thanks!
Ha ha ha! Your incognito photo at the end there was my FAVORITE PART! (I’m such a cheeseball.) And this post is really making me wish our walls weren’t textured so I could do some holiday wall vinyl up in here. Yours looks fantastic, my dear! So elegant!
Thanks for participating in our December Challenge & Giveaway and helping to make it so special!
What a great idea for decorating a small space. If my bathroom walls weren’t textured, I would totally steal your idea!
lol, thanks!
I love it!!! Great job!