
DIY Ugly Sweater!
Little Crafter goes to a really awesome school. As a matter of fact, I wish on pretty much a daily basis that it had existed when I was a kid so I could have attended it too. This week, they’ve got some super fun things planned, including the event Little Crafter has been looking forward to for months…pajama day. But before that comes another very special event…Ugly Sweater Day!

Of course, LC doesn’t happen to own an “ugly sweater,” because most of what they put out in stores for kiddos these days is just plain adorable. Not to mention the fact that he refuses to wear anything he thinks is ugly. Hmm. The little pinecone didn’t fall far from the tree, did he? As a matter of fact, when he first found out about the spirit day, he balked at the idea until I started calling it a “Silly Sweater” instead. So, if you see him, please do me a favor and call it silly instead of ugly so he doesn’t rip it off, mmm-kay?
Now. Getting down to business. We needed a gaudy sweater, stat. LC didn’t want me to “mess up” any of the sweaters he already owned, so we took a little field trip to the local Goodwill where we found a plain red sweater in his size for less than $2. Score.
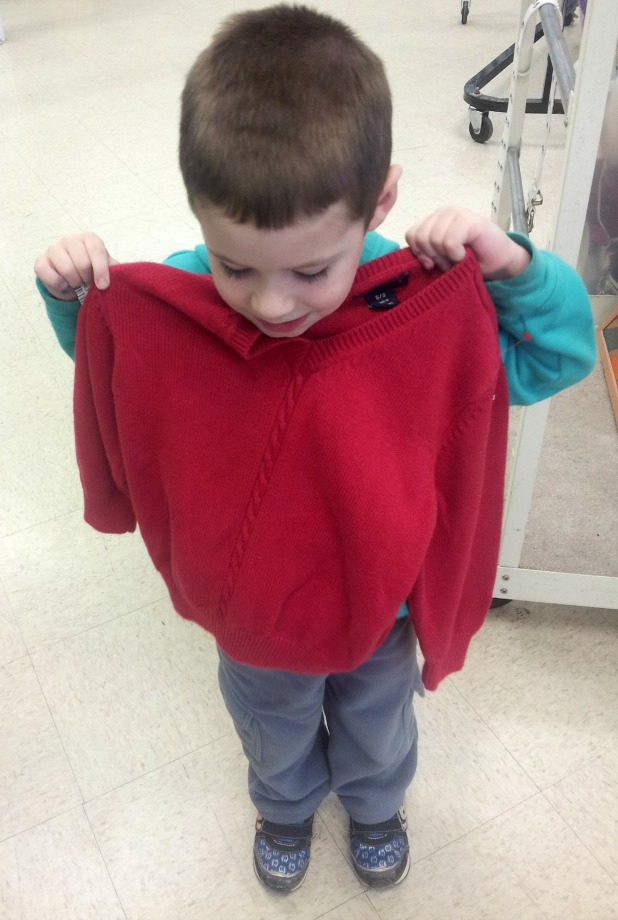
Little Crafter, once he bought into the whole idea, got very excited about helping to decorate it and insisted that I wait until he was home from school to work on it. I promised him I would only do the grownup jobs that he couldn’t help with and I’d save the fun part for him. Here’s what we did to ugli-fy that sweater. Everything came right from our craft stash, so the whole project cost less than two dollars.
Materials:
– sweater
– felt, assorted colors
– scissors
– thread and sewing needle
– hot glue gun and glue sticks {I recommend low temp}
– assorted embellishments: buttons, pom-poms, sequins, jingle bells, etc.
– cord, ribbon, or shoelace
– Elmer’s glue
Step 1: Cut and pin a felt tree onto the sweater. I just took a piece of dark green felt, laid it horizontally and folded it in half. I cut out the shape of half a tree so that when I opened it up, I had a tree that was the same on both sides. It was easy to find the center of the sweater since it had a stripe of decorative stitching down the front, so I lined up the tree and pinned it in place.

Step 2: Sew the tree to the front of the sweater. If you’re not much of a seamstress or are just pressed for time, you can totally hot glue it in place instead. If you’re hand stitching like I did, be sure to use a nice contrasting color to make it gaudier, and don’t worry about making your stitches nice and even. Remember, we’re going for hideous here. The only thing to make sure you avoid is sewing the sweater shut, so keep your hand in between the layers while you stitch.

Step 3: Add a felt star! I don’t have an individual photo of this {you’ll see it below, though}, but cut a fabulously uneven and large star out of the brightest yellow felt you can find and sew it on with thread that doesn’t match.
Step 4: Decorate the sleeves. Because a giant obnoxious Christmas tree isn’t enough. I found some shoelace type cord in my stash {who knows where it originated} and cut it in half. Then, I hand stitched it onto the top of each sleeve in a fabulously random wiggly line. My idea was to make it look like the cord of a strand of lights going down each sleeve.

Step 5: Bling it out! This is the FUN part! No holds barred, grab your stash and go crazy! We had sparkly pom poms, which LC loves, buttons, jingle bells, and beads to work with…use whatever you’ve got! Little Crafter decided the first thing his tree needed {after adding some beaded garland} was…GLITTER! We spread some good ol’ Elmer’s glue on the felt and sprinkled on {a LOT} of glitter we got from our friends at CraftProjectIdeas.com.

Once the glitter was all in place, LC glued on some buttons from our friend Laura at Buttons Galore, those pom poms, and a few jingle bells as ornaments. Then, he glued pom poms down each sleeve to be like Christmas lights.

Once all the glue was dry, the only thing left to do was try it on! What do you think?

I gave a few special friends a sneak peek of the finished product yesterday, and some of my nearest and dearest {ahem, Erin} accused us of being the only people she knew who would try to make an ugly sweater and end up making it cute. But, cute or ugly, I think it definitely can be called a Gaudy Christmas Sweater and Little Crafter will fit right in wearing it at school! Meanwhile, is it just me, or is he just plain adorable?!

PS. If you liked this project, check out the newest ugly sweater we made using handprints and a whole lot of glittery goodness!
Hugs & Glitter,


AAHHHHH hahaha!! Love it!!! Pinning!!! still laughing :o)
How fun!!
So cute!
Amy! You are so silly!! That sweater is NOT ugly…it’s ADORABLE! LOL
Yeah, as far as “ugly” sweater goes, you lose. I’ve seen MUCH worse out there. But my son wouldn’t go for the whole “ugly” thing, either, so kudos on calling it “silly sweater” 🙂 It IS that.
What a cute sweater! He looks adorable. My favorite part is the sleeves, so clever. 🙂
He is so adorable…Love the sweater…
He’s so adorable!!! It turned out awesome!! Maybe instead of buying an ugly sweater, I’ll make mine next time. 🙂
I love it! And yeah, it’s not as ugly as it is cute, but that could be because LC is SO FLIPPIN’ ADORABLE! 🙂
Thank you so much for sharing this on the DBB today! Pinning!
– Brooke –
Absolutely adorable. Thank you for sharing with us at Buttons Galore.
Haha I love it! Glad you went with the felt tree and pompoms. It totally makes the look =)
Only one word for the model and sweater…..adorable!