
Loopy Turquoise Earrings: Kate from Cheap Crafty Mama
Hi! I’m Kate from Cheap Crafty Mama and I’m so excited to be guest-posting today here at One Artsy Mama! Amy is over at my blog with a “double strand beaded jewelry” tutorial. She has been so sweet with helping me figure out some things here in the bloggy world and I just love One Artsy Mama! I get so many great ideas of things to make with my little boy and also for myself!

A little about me… I have been married to the love of my life for over 8 years. We got to move around for a while and now we have settled down in the town where I grew up to start a family and put down roots. I traded in my paint brush (I was a professional decorative painter, a job I loved) to be a stay-at-home-mom (my real dream job) but I still find time to do plenty of arts and crafts, home decorating, and cooking… all of which I share about on my new blog Cheap Crafty Mama!
Today I’m going to show you how to make these fun, loopy turquoise earrings. They are inspired by these I saw at Anthropologie (and they happen to cost a lot less than $198 to make)!

You will need:
silver wire
2 silver pin-wires
2 large turquoise beads, drop-shaped
12 smaller turquoise beads
32 small silver beads
silver earring hooks
pliers (flat-tipped & round-tipped)
clippers
To get started, put the drop-shaped turquoise beads on the pin-wires.

Use your round-nosed pliers to create a loop at the top and clip off the excess wire.

Cut 2 pieces of wire to 3-6/8.” Use your fingertips to bend the wire into an arch-shape. Using your round-tipped pliers, make a small loop at one end.

Put 6 turquoise beads on the wire, alternating with 7 silver beads. Then make a loop at the other end of the wire.

Cut 2 pieces of wire 2-3/4″ long. Make a loop at one end, put on 9 silver beads, then make a loop at the other end (just like the longer turquoise-beaded wires).
Bend the beaded wires so they form circles, with the loops on the ends facing towards the back.
Now you have all the parts ready to assemble for your earring, you just need to make a loop to hold them all together.

To make a 1/4″ wire loop, wrap the wire around the thick part of the round-tipped pliers and cut off the excess wire.

Now assemble your earrings. Hold the 1/4″ loop in your flat-tipped pliers and slip the loops from the beaded wire and teardrop dangle into the loop.

Then pinch the loop tightly closed.

Now use your flat-tipped pliers to open the loop on the earring hook, slip the 1/4″ loop in, then pinch the earring hook loop closed.

I hope you have enjoyed learning how to make these super cute earrings! I would love it if you would come visit me at Cheap Crafty Mama! I’ve got lots of other handmade gift ideas for the upcoming holidays. You can sign up to receive updates for my posts (via email, RSS, or facebook) so you can be inspired to create a lot out of a little!
*********************************
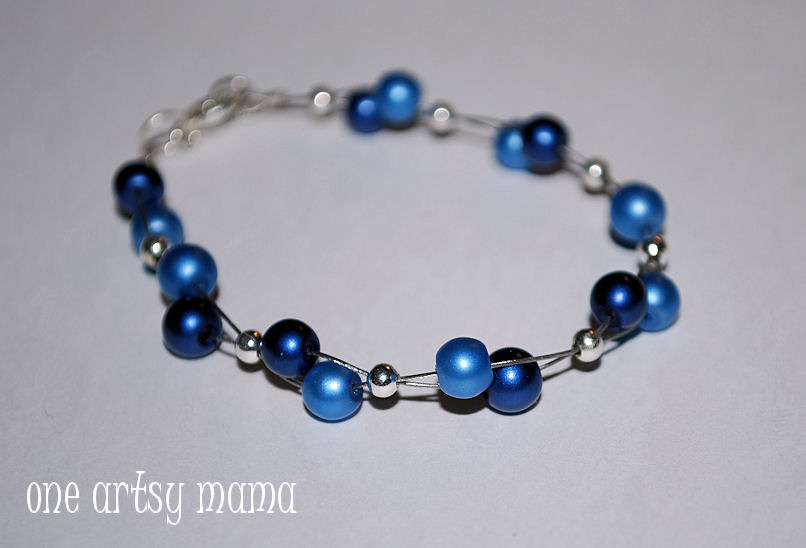
I don’t know about you all, but boy do I love those! They look awesome, Kate! I’m so glad you shared them here today. They’re so fashionable and so do-able too. And if you’re in a jewelry making {or looking} mood, hop on over to Cheap Crafty Mama for my double strand beading tutorial. Here’s a sneak peek:
See you there!


Wow!! It’s an impressive copy. No wonder you used to be a decorative painter – you’ve got the style and the patience. Great job!!!
I really enjoyed this jewelry making tutorial; I always wondered how people just whipped up fabulous jewelry. Doesn’t look to difficult! I gotta get me some tools, wire, and beads pronto. And your necklace, I love that color blue, so pretty for the holidays!
These are really pretty. I love the turquoise mixed with the silver. Can you please tell me what gauge the silver wire is? Thanks.
Those look so awesome and fairly easy to make! :o)
Jamie
For Love of Cupcakes
I SO wish I could make jewelry. So pretty.
LOVE these! Great tutorial. I’m pinning this for gift ideas!
Thanks for the comment love! Terry, I wish I could tell you the guage but I have had the wire forever and don’t remember. Also you have to see what guage will work with your turquoise beads b/c some have different sized holes.
Great tutorial 🙂 thanks!