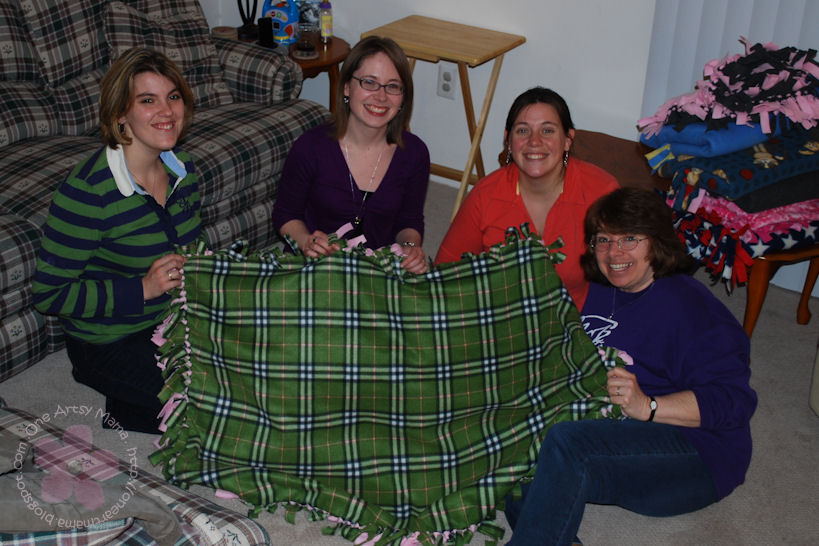
Often, one of the best things about making something is the joy of sharing it with another person. Admittedly, there are plenty of things I keep for myself, like the photo plaque I made last week, but more often than not, I like to give things away to bring a smile to someone else. If you’ve been stopping by for a few weeks, you’ll know that our Bible Study group recently decided to make a difference in our community by making blankets to give away. Initially, we were going to make them for hospitalized children, but as we called around to the hospitals, we found that Project Linus is already doing a fantastic job of keeping them supplied. They didn’t really need any more blankets, so we decided to shift our focus to a group that often gets overlooked; the patients in our local nursing home.
We decided on no-sew fleece blankets so that everyone could participate, no matter what their crafting experience was. We bought the fleece a few weeks ago, which was an adventure, and this past Friday night, we got together for pizza and blanket-making. The dads watched the little ones while the ladies worked on tying lots and lots of knots…I was literally still tying in my sleep! Here’s how to make a blanket of your own:
NO-SEW FLEECE BLANKET
Materials:
– 2 pieces of coordinating fleece per blanket: you can use 2 solid colors, a print and a solid color, or even the same fleece for both sides
*We used 1 1/4 yards per side, which would work for a baby/toddler and as a lap blanket for the nursing home patients. For a full size adult blanket you’d need 2 or 2 1/2 yards.
– Scissors, Ruler
– 4″x4″ square of paper or cardstock
STEP 1: Trim selvage and lay the two pieces of fleece on top of each other with the right sides facing out. Trim so they’re as close to exactly the same size as possible.
STEP 2: Place the 4×4 square in one corner and cut through both layers of fleece, cutting the corner out. Repeat in other 3 corners.
STEP 3: Cut fringes by cutting 4″ deep into both layers at 1″ intervals. My mom did these first three steps for us, and she found it helpful to have a piece of paper she’d measured and cut as a pattern, then just moved down the blanket as she worked, instead of measuring each time.
STEP 4: Once fringes are cut, work your way around the blanket tying the fringes in double knots. Some instructions I saw said to tie every other knot from one side, then flip the blanket over and tie the rest from the other side. We didn’t do that and they still look great. We look like we’re really hard at work, right…ha ha!
That’s all there is to it! The prep work of the cutting takes the most time, the actual tying was quick and easy. It was a lot of fun to do as a group too…but then again, everything with these guys is fun…
We did reserve one blanket in particular for someone special; my mom’s friend has a cousin named Lori who is battling breast cancer and going through extensive chemo treatments. We learned that Lori loves green, so we made her this blanket that’s a combination of green and pink to represent our support for her struggle. My mom (the lovely lady in the purple sweatshirt) is going to make sure it gets delivered soon.
Lori, this one’s for you! We’re praying for you!
These blankets are awesome; they’re warm, they’re soft, they’re easy, and they can look completely different depending on the fleece you choose. We thought a veteran might like the red, white, and blue with stars, while we also made one with cats, one with pink flowers, and one with multi-colored stripes. Noah got the test-model with Curious George all over it. I may or may not have my eye on a particular pattern I saw when we bought all the rest that I think would look great on my bed. 🙂
Well, time to get back to my boys. We’re off to the local “Peep Show” – marshmallow peeps, that is! People make things out of the peeps and put them on display at the arts center…stay tuned for pics! Hope your weekend is as wonderful as ours has been so far!
That was lots of fun…they turned out really nice. I have a few more cut and ready to be tied… This was a great idea. I’m sure the people who get them will be very happy. Enjoy the Peep Show.
Hi guys what a great idea. Im sure all the receivers of these treasures will truely love and appreciate them. We know all about Project Linus as Brayden got one of the blankets made by a very sweet caring person when he was in University of Maryland Peds. ICU with RSV. And I’m sure it will be a treasure for many years to come. And for you all to do the same things for people that alot of people forget about is even better. GOD bless you all. You are all GODS Angels here on earth Helping spread his word.. Love you .. Keep up the good work
This is a great idea to give back. We have a nursing home just down the street and wanted to go sing to the elderly there. It would make it even better to bring some of these blankets to donate.
Aunt Laurie – Thank you so much for your sweet comment. I’m glad that Brayden got one of the Linus blankets; that’s such a neat ministry. I can’t wait to meet him sometime soon! Love you.
Amanda – Ooh, I love the idea of singing to the elderly too! We were thinking we’d bring along our children when we deliver the blankets because that’s sure to bring a smile!
I’m sure there are many places that would love to receive them! You can check with your local hospital, local nursing home/assisted living facilities, and any local cold weather shelters.


That was lots of fun…they turned out really nice. I have a few more cut and ready to be tied…
This was a great idea. I’m sure the people who get them will be very happy.
Enjoy the Peep Show.
Hi guys what a great idea. Im sure all the receivers of these treasures will truely love and appreciate them. We know all about Project Linus as Brayden got one of the blankets made by a very sweet caring person when he was in University of Maryland Peds. ICU with RSV. And I’m sure it will be a treasure for many years to come. And for you all to do the same things for people that alot of people forget about is even better. GOD bless you all. You are all GODS Angels here on earth Helping spread his word.. Love you .. Keep up the good work
This is a great idea to give back. We have a nursing home just down the street and wanted to go sing to the elderly there. It would make it even better to bring some of these blankets to donate.
Aunt Laurie – Thank you so much for your sweet comment. I’m glad that Brayden got one of the Linus blankets; that’s such a neat ministry. I can’t wait to meet him sometime soon! Love you.
Amanda – Ooh, I love the idea of singing to the elderly too! We were thinking we’d bring along our children when we deliver the blankets because that’s sure to bring a smile!
A friend mine and myself are making lap blankets would like to know where to send them
I’m sure there are many places that would love to receive them! You can check with your local hospital, local nursing home/assisted living facilities, and any local cold weather shelters.