
A "Bee-utiful" Day
It’s another rainy day. 48 degrees, drizzle, and gray skies are a dangerous combination for an energetic two-year-old who doesn’t understand why the playground isn’t an option. So, I decided it was the perfect opportunity for One Artsy Mama to pull out the craft supplies and make the most of a wet Wednesday. We usually do well with a theme, so I decided we’d focus on making it a “BEE-utiful Day” despite the weather. I recently saw an adorable idea on the blog Of Pinks and Fairytales where Janelle made a bumblebee out of a plastic Easter egg. I’d been wanting to try it with Little Crafter, so after taking stock of our supplies and making a quick run to WalMart for some white felt {LC insisted on wearing his striped pajamas and rain boots there or he wasn’t going}, we gave it a go. Here’s what we did:
Materials:
– yellow plastic easter egg
– 2 googly eyes
– black felt
– white or gray felt
– 4 small beads
– glue
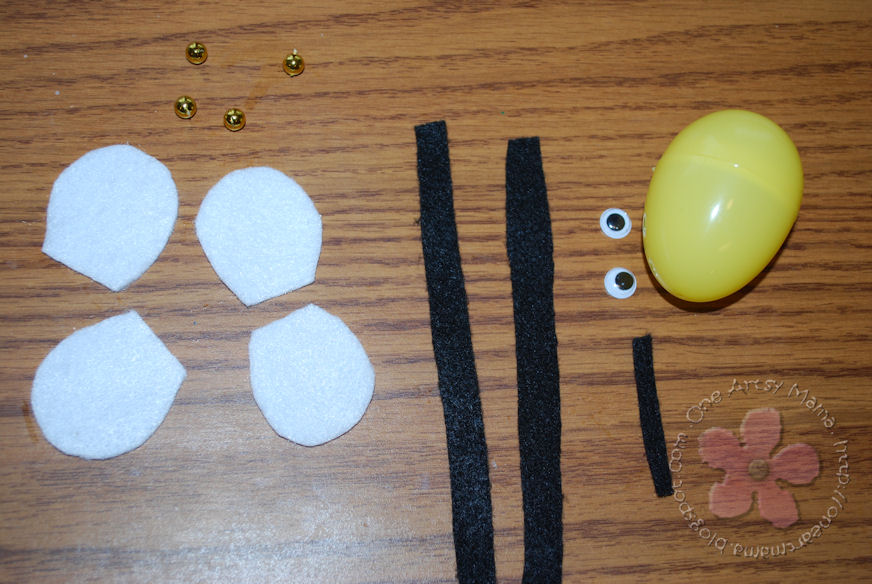
STEP 1: Cut two thin strips of black felt that are long enough to circle your egg. Wrap around your egg and glue in place.
STEP 2: Cut 4 petal shaped wings…I didn’t use a pattern, just eyed it up. Glue them on the top of the egg in a wing formation.
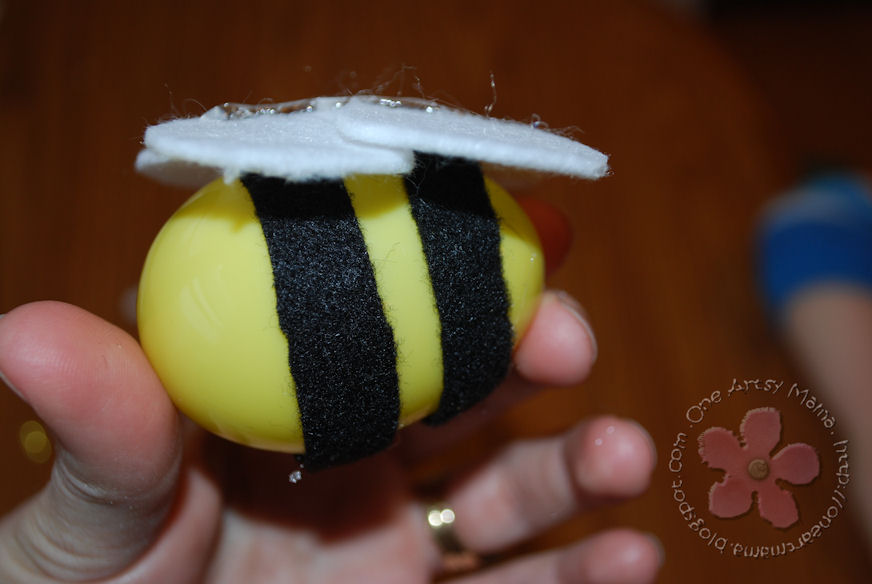
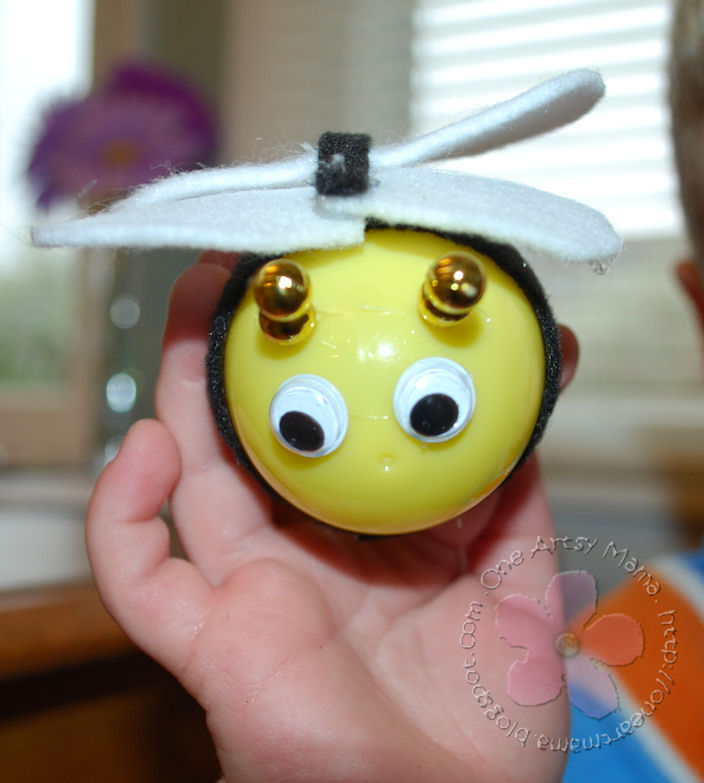
STEP 3: Cut a small, thin strip of black felt to cover the seam where the wings come togther and glue in place.

STEP 4: Add eyes and beads for antennae. You can also add a mouth with a permanent marker if you like.


The last piece of our bee-themed morning was reading one of LC’s favorite stories, Buzz, Buzz, Busy Bees
by Dawn Bentley.
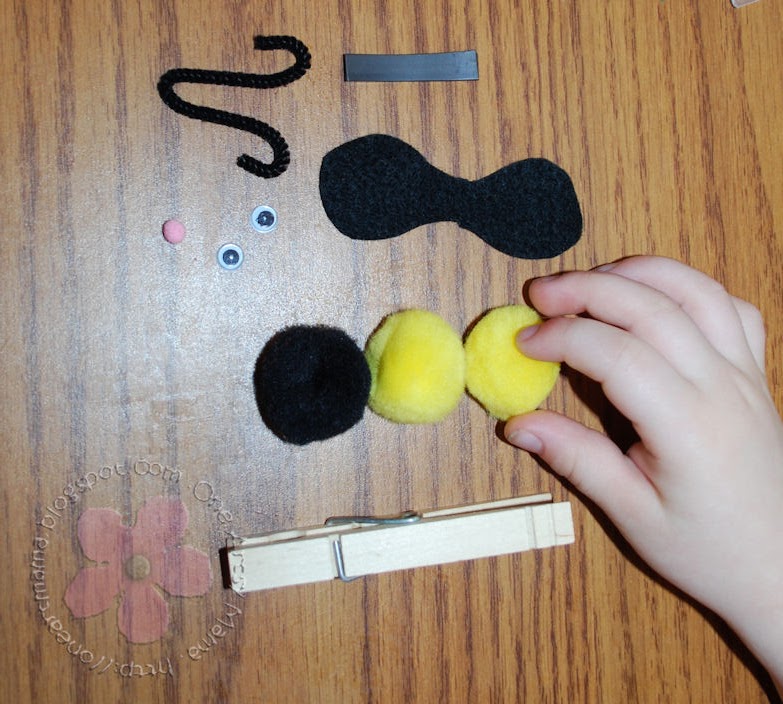
As we ate lunch, I found myself contemplating the remaining plastic eggs in our pack and thinking about something I’d seen on Martha Stewart’s website {thanks to Janelle’s link} where she made all kinds of animals out of eggs. Cute little birds, cows, pigs, bunnies, ducks…you name it, Martha can make it. The eggs she used were actually real ones that had been hollowed out, but with a toddler involved, plastic was definitely a better call. Using scrap felt, pom-poms, eyes, and feathers I had laying around, we were able to make an adorable bunny and duck to “bee” friends with Little Crafter’s earlier creation.
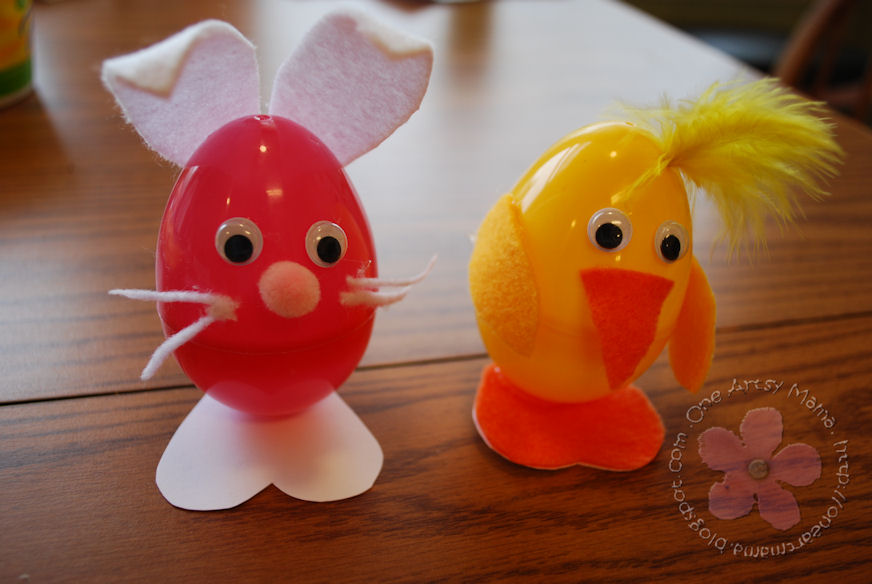
BUNNY:
– white cardstock
– white felt
– pink pom pom and white pom pom
– googly eyes
– glue
Cut a heart out of cardstock and glue egg to it so it will stand up. Cut 2 ear shapes out of felt, attach, and curl slightly. Glue on eyes, nose, and tail. Cut very thin pieces of felt and attach as whiskers.
DUCK:
– white cardstock
– yellow and orange felt
– googly eyes
– feather
– glue
Cut a heart out of cardstock. Cut same size heart out of orange felt and glue together. Glue egg on top. Cut wing shapes out of yellow felt and beak out of orange felt; glue in place. Glue on eyes. Attach feather…my egg actually had a few tiny holes in it {all the ones at WalMart did this year, for some reason} so I stuck the feather tip down in the hole.
Here they are hanging out with their friend, Buzzy Bee. For more info the centerpiece itself, which I change seasonally, see my Cheap & Easy Centerpiece idea.


I can’t wait to try to make these fun crafts with Nathan. He loves doing fun things like this. I really like the bee magnet.
Oh oh oh oh ooooooooohhhhhhh!!!! These are WONDERFUL! So cute! So clever! Wow!! Love love love! One better than the next!
Thanks for sharing them on kids get crafty! Lovely to see you there 🙂
Maggy
Lovely Bees…What fun you guys have.
You turned a dreary day into a truly “bee”utiful
day. It’s no wonder Noah is so happy. 🙂
Aaaww those are ‘tuuute’! 🙂 I wish my daughter is old enough so we can craft together too. Your centerpiece with all those cute colorful animals is just too adorable. It’s so much fun to look at. Thanks for sharing this with me 🙂
Hi Amy, I hope you don’t mind but I shared your cute animals on my site too. I updated my post to include a link to your tutorial on the other animals 🙂
http://ofpinksandfairytales.blogspot.com/2011/04/my-silly-bee.html
Thanks, girls!
Janelle – Thank you for linking your post to mine! I’m so glad you like how they turned out! You will love it when your daughter is able to help craft; Noah brings me such joy when we create things together.
Shelley – I want pictures when you do it!
Absolutely adorable! Your little one looks so pleased with them too! I really like the clothespin! I may need to give this a try!
I saw you over at Red Ted.
Kerri
So sweet & a fun way to recycle all those eggs! You could add rice or beans to make the egg bee a shaker.